Cleaning a room
Cleaning the wash basin or sink
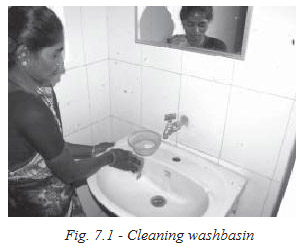
A washbasin is used to wash face and hands, and a sink is used to wash vessels (Fig. 7.1). Washbasins are present in bathrooms, toilets, the catering section, patients’ rooms, and doctors’ rooms. Due to frequent use the washbasins become dirty leading to stain formation and disease causing bacteria growth in the drains. Therefore a washbasin should be cleaned thoroughly twice a day - once in the morning and once after lunch. Remnants of food may clog the catering section wash basin and emit a bad odour or cause dirty water to fall on the floor. The blocks in the drain should be removed immediately, the washbasin should be cleaned, and the dirty water on the floor should be mopped.
Equipment and supplies
- - Cleaning agent
- - Scrubber
- -Swabbing cloth
Method of cleaning a washbasin / sink
- - Make a solution using the cleaning agent
- - Clean the washbasin/sink with a nylon brush while keeping the tap running to flush the drain.
- - Turn off the tap
- - Soak the scrubber in the solution and scrub the washbasin/sink thoroughly. Do not forget to scrub the outside and underside of the washbasin or sink
- - The sieve area should be thoroughly scrubbed; otherwise moss will form causing it to appear dirty and stained
- - Rinse everything thoroughly with water
- - Wipe dry with a cloth
- - If tiles are fixed on the wall above the wash basin/ sink, they should also be scrubbed and wiped
- - Water splashed on the floor should be wiped with a cloth. Then the floor should be scrubbed and again wiped dry with a clean cloth
- - Inspect the work. A well-washed washbasin will look as good as new
Hydrochloric acid
Hydrochloric acid is highly caustic and care should be taken to ensure that it does not come into contact with the skin. Housekeepers should ensure that the cleaner is wearing gloves when using hydrochloric acid.
- - Hydrochloric acid is used if tough stains such as salt stains cannot be removed with soap and water
- - A small piece of cotton attached to a stick should be used to apply hydrochloric acid. Apply it directly on the stain to be removed
- - Wash the area with water after the stain is removed
A clogged / blocked sink
Sometimes various solid particles or matter that goes down the drain will clog the sink and the water will not drain quickly or will not drain at all. Remove the waste matter and food particles by hand and clean the small holes in the drain with fine wires. Check if the blockage has been removed by running the water.
If the block has not been removed, remove the drain pipe and check for the cause of the blockage. When removing the drain pipe, place a bucket under the sink to collect the dirty water that flows out.
A caustic soda stone can be placed in the sink to prevent clogging. Be careful when handling the stone, for it causes a burning sensation on the skin.
If none of the above methods work for removing the block, call a plumber.
Cleaning the bathroom
Equipment and supplies
- - Cleaning agent
- - Scrubber
- - Sponge
- - Acid solution
- - A multi-action mop
Method of cleaning a bathroom
- - Before cleaning the bathroom, shake the bathmat out and beat it against the floor
- - Place the bathmat outside the bathroom and using a bucket and a mug pour water on the walls of the bathroom
- - Wet the door, window and ventilator and wash it with water. Any dirt should be scrubbed using a scrubber and the cleaning agent, and washed with water
- - Clean the wash basin in the toilet
- - Scrub the floor of the bathroom and wash it with clean water
- - Remove the water from the floor using the multi- action mop and wipe the floor with a dry swabbing cloth
- - Inspect the work. A bathroom should look clean, and should always be kept dry
Cleaning a bathroom / toilet
The number of bathrooms and toilets depend on the size of the hospital and the number of patients. Separate toilets are provided for male and female patients or visitors in the out-patient and in-patient sections. Since out-patient toilets are used by many people, they should be cleaned several times a day. The frequency of cleaning will depend on the usage. The in-patient toilets should be cleaned twice a day. Toilets should always be dry because people who exit a wet bathroom or toilet will leave footprints and dirty the corridors. Puddles can be a health hazard because germs breed in wet places and patients can slip and injure themselves. Toilets that are dirty will smell and are unhygienic. Hence they should be cleaned several times a day. A notice requesting patients and visitors to flush the toilets may be posted in the toilets, and housekeepers should maintain toilets with frequent and thorough cleaning
Equipment and supplies
- - Gloves
- - Cleaning agent
- - Scrubber
- - Wooden brush
- - Round brush
- - Harpic or toilet cleaner
- - Phenol or disinfectant
- - Odonil or air freshener
- - Stick broom
- - Multi-action mop
Method of cleaning an Indian toilet
- - Gloves should be worn when cleaning the toilet
- - Form a solution with the cleaning agent
- - Sprinkle this solution on the floor of the toilet and scrub thoroughly
- - Rinse the floor with water
- - Remove any stains on the floor when scrubbing it
- - Wet the walls, and scrub using a scrubber and the cleaning agent
- - Wash the walls and wipe dry
- - Scrub the footrest with the soap solution and a wooden brush and wash it
- - Squeeze “Harpic” (or any liquid toilet cleaner) on the inside of the toilet and scrub it with the round brush
- - Clean the outlet thoroughly, again using the round brushes
- - After the toilet is completely cleaned and washed, pour a disinfectant, inside the toilet and the outlet
- - Finally wipe the door, window, ventilator and mirror with a wet cloth
- - Wipe again with a dry cloth to clean out any dust and dirt
- - Remove any water from the floor of the toilet, using a multi-action mop
- - Inspect the work. There should be no stains, and the floor should be dry
- - Place “odonil ” near the toilet to absorb bad odour and leave a pleasant fragrance
Method of cleaning a western toilet
- - Gloves should be worn when cleaning the toilet
- - Form a solution using the cleaning agent
- - Flush the commode using a bucket of water, so that the stagnant water is emptied out
- - Scrub the outer walls of the flush tank with the soap solution using the scrubber
- - Scrub the outside and the top of the commode with the soap solution
- - Squeeze “Harpic” on the inside of the toilet bowl and scrub it with the round brush to remove any stains in the bowl
- - Wash all the scrubbed areas with water and wipe the flush tank, and the outside of the commode (pedestal, seat, lid and the surrounding area) with a dry swabbing cloth
- - Scrub the tiles on the walls and wipe the windows and door
- - Remove the water that has spilled on the floor with the multi-action mop
- - Wash the floor of the toilet, and wipe it dry with a swabbing cloth
- - Inspect the work. The toilet should be stain-free and dry
- - Place “odonil ” in the toilet to absorb bad odour and leave a pleasant fragrance
Washing the walls
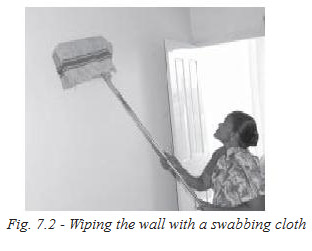
Although less dirt collects on the walls in comparison to the floors, it is just as important to keep the walls spotlessly clean. When the patients and attendants lean on the walls, oil from their hair and dirt from their hands leave stains on the wall. Betel juice that is spat in corners also forms stains on the wall. Walls should be washed once a fortnight, when there are no patients in a room,. The walls of the corridors and common areas should also be cleaned when the patient flow is less (Fig. 7.2).
Equipment and supplies
- - Cleaning agent
- - Sponge
- - Duster
- - Bucket
- - Cup
- - Ladder
- - A soft broom
- - A stick broom
Method of washing a wall
- - Remove the curtains, bed, chair, photos and miscellaneous items from the room and keep them in a safe place outside the room
- - Using a soft broom, remove the dust and cobwebs from the walls
- - Use the cleaning agent to form a soap solution
- - Dip the sponge in this solution and start wiping the wall
- - The wall should be wiped length wise, from top to bottom
- - Divide the wall into imaginary sections
- - After every section is cleaned with the soap solution wash it with water
- - Repeat this process until all sections of the wall are cleaned
- - Finally when the bottom is reached, wipe breadth wise
- - After the wall is completely washed with water, wipe the wall with a clean and dry swabbing cloth. Any droplets of water will leave unsightly watermarks on the wall
- - Inspect the work. A clean wall will not have any marks on it
- - Remove the dirty water that has collected on the floor, and wash the floor with clean water
- - Remove all the water from the floor and mop it dry
Cleaning the waste bucket
Residue of water and dust leave stains in buckets, mugs and trash cans. These stains cannot be removed with soap and water. We need to clean the waste buckets at least once a week.
Equipment and supplies
- - Hydrochloric acid
- - Cleaning agent
- - Water
- - Scrubber
- - Stick broom
Method of cleaning a waste bucket
- - The housekeeper must ensure that the cleaner is wearing gloves when performing this task
- - Remove the garbage from the waste bucket. Pour water in the bucket and let it soak for at least 30 minutes
- - Remove the water and use the stick broom to remove remnants of food and other waste from the fringes of the bucket
- - Using the cleaning agent and the scrubber, scrub the inside and outside of the bucket
- - Apply hydrochloric acid on stains and leave it for 30 minutes
- - Wipe the hydrochloric acid using a piece of cloth torn from a damaged bed sheet
- - Wash the waste bucket with the cleaning agent and let it dry in direct sunlight to remove the bad odour and germs from the bucket
- - Inspect the work. A bucket that has been washed well will look clean and stainless
Bed making
Equipment and materials needed
- - Cloth duster -2nos
- - Pillow cover
- - Bed sheet
- - Additional sheet
Making a bed
A patient requires a comfortable bed to take rest and recover and a well- made bed will not only provide comfort but also add to the pleasant ambience of their room.
Changing dirty linen
Method
- - Take clean bed sheets and clean pillow covers
- - Knock on the patient’s door and politely ask permission to enter and make the bed
- - Make polite enquiries about the patient’s health, and say a few comforting words
- - Help the patient get out of bed and sit on the chair
- - Remove the outer cover of the pillow by gently untying the knots
- - If the inner cover is not clean, remove it as well.
- - Gently remove the used sheets from the bed by carefully folding it into four, so that the dust does not fly around. Place this along with the pillow covers with the dirty linen outside the room
Spreading a clean bed sheet
Method
- - Fold the mattress into two and wipe the dust under the mattress with a wet cloth
- - Wipe the bed thoroughly with a dry cloth. A damp bed will cause the mattress smell
- - Clean and dust the legs and the underside of the bed in a similar manner
- - Make sure that the bed sheet to be spread has no stains and is not torn
- - Fold it uniformly and place it in the centre of the bed
- - Lift the mattress breadth wise above the bed, and tuck one end of the bed sheet under the mattress
- - In a similar manner tuck the opposite end. Make sure that there are no creases in the bed sheet after it is tucked
- - The four corners of the bed sheet which remain unfolded should be mitered. (To miter a corner, tuck in along the foot or the head of the mattress, lift a point along the sheet 30cm from the corner and tuck in the remaining portion. Next drop the flap and tuck in) (Fig. 7.3).
- - Tuck in the sides along the length of the bed (Fig. 7.4).
- - Pat the bed sheet to remove any creases
- - Inspect the work

Putting on a pillow cover
Method
- - Change the inner cover only if it is dirty
- - Fold the pillow in half, slip it into the cover, then unfold to fill out the pillow cover
- - Slip the knotted side of the inner cover into the outer cover first
- - The opening of the pillow cover should not be visible
Arranging the bed
- - Place the pillow at the head of the bed
- - After the bed sheet has been neatly spread and the pillow cover has been put on, fold the additional sheet neatly and put it at the foot of the bed
- - Settle the patient comfortably on the bed again, thank him, and then leave the room
Cleaning the telephone
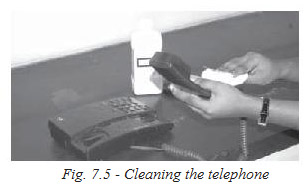
Phones are used by a wide variety of people and are a common source of indirect infection. Germs on people’s hands transfer onto the receiver’s handle and oral microbes spread onto the mouthpiece. Daily thorough disinfection of the phone is necessary (Fig. 7.5)
Equipment and materials
Method of cleaning and disinfecting the phone
- - Wipe the mouthpiece and the receiver of the phone with a clean cloth
- - Wipe all the parts of the phone with cotton soaked in spirit
- - Wipe the numbers on the phone with spirit
- - Stretch the wire and wipe with spirit
- - Re-wipeallthesepartswithaclean,drylint-freecloth
- - Inspect the work. There should be no marks on the phone
Key points to remember
- - The washbasin should be cleaned twice a day
- - A lot of caution needs to be exercised when using hydrochloric acid, as it burns the skin and causes sores
- - Always wear gloves when cleaning the toilet
- - Bathrooms and toilets should always be kept dry
- - Clean the wall from top to bottom working length wise
- - Divide the wall into small portions for the purpose of cleaning
- - When the bottom of the wall is reached, scrub and wipe the wall both length wise and breadth wise
- - Torn or stained bed sheets and pillow covers should be replaced immediately
- - The bed sheet should be spread so that there are no creases, and the corners should be tucked in firmly and neatly
- - The receiver and the mouthpiece of the phone should be cleaned thoroughly
- - While cleaning the phone ensure that the spirit on the cotton does not get into the holes on the mouthpiece and the receiver
Cleaning the operation theatre
Operation theatre (OT) deals with open wounds during surgery, and so it is a high risk area for infections in a hospital. It is extremely important that the OT is kept not only clean but absolutely germ free. Unlike the other areas of the hospital, which are cleaned using a disinfectant, the OT is cleaned using a stronger disinfectant.
Cleaning the OT can be divided into daily cleaning and weekly cleaning.
Dailycleaning
- - Walls
- - Floors
- - Doors
- - Overhead lamps & Fan
- - OT Tables
- - Tables
- - Microscopes
Weeklycleaning
- - Furniture and equipment
- - Air conditioner filter
The cleaning procedures are the same as that of cleaning the rooms. However the cleaner and housekeeper should take extra care to protect themselves with gloves and face mask when handling strong disinfectants.
For a demonstration on cleaning a patient’s room and operation theatre, please watch the video of the CD.
Student exercise
Answer the following
- How would you unclog a blocked washbasin?
- How would you wash a toilet?
- Describe the procedure for washing walls
- What do we need to do to keep the hospital odour free?
- Why is it important to provide fresh linen to the patients daily?
- Why is it necessary to wipe the portion of the bed under the mattress every time we make the bed?
- Describe the method of spreading the bed-sheet