TitanX

Housekeeping in Eye Care Services Manual - Chapter 8

Print Manual

Maintaining a Floor

Removing stains

Stains

Floor stain

Floors that are used every day such as in rooms, corridors, stairs, bathrooms and toilets tend to get heavily stained.

Simple stains

Examples of simple stains are dust, soil, foot prints, betel juice and salt stains, which, if left unattended, can result in tough stains. Simple spills such as tea, coffee or oil are also easy to remove, but if not cleaned quickly can accumulate dust and leave stubborn stains. Seemingly harmless spills such as water can form moss and leave permanent damage on the floor as well. Avoid unnecessary work by removing stains and spills at the earliest possible stage.

Tough stains

Tough stains are often the result of neglected simple stains. However, a few stains are difficult to remove even if attended to quickly and can become impossible to remove if left for too long. Petrol, oil, and diesel leaks from vehicles should be removed immediately by scrubbing. Thick stains, such as tar and chewing gum, should be removed by scrubbing toward the centre of the stain to prevent the stain from spreading.

Methods to remove stains

There are two methods to remove floor stains. – By hand, and by machine.

Stains in smaller areas can be removed by hand, while very tough stains, or stains in large areas can be removed using a machine.

Equipment and supplies

  • - Small wooden brush
  • - Cleaning agent
  • - Swabbing cloth
  • - Multi - action mop
  • - Buckets - 2nos
  • - Water

Method of removing floor stains by hand

  • - Fill one bucket with a solution using the cleaning agent and the other bucket with clean water. Place both the buckets on mats to prevent soiling of the floor
  • - Sweep the floor, sprinkle the soap solution and scrub with a small wooden brush
  • - Brush out all the stains
  • - Mop up the excess water with the multi-action mop
  • - Wipe dry with the swabbing cloth
  • - Rinse the cloth in the bucket of clean water and wipe again
  • - Repeat this process until the stains are completely removed
  • - Inspect the work. There should be no marks or patches
  • - Clean the equipment and put them back in their place

Removing the stain with a machine

Stains on the floor can be removed using an electric polishing machine, but this should be reserved for stains that cannot be removed by any of the methods mentioned above, because it can be used only once in six months. The machine has different brushes for removing the stains and for floor polishing. Stains should be removed before the floor is waxed and polished, so ensure that the right brush is attached before beginning each task.

Equipment and supplies

  • - A stain removing machine
  • - A bucket
  • - Cleaning agent
  • - Multi-action mop,
  • - Swabbing cloth.
  • - Water

Method of removing floor stains using a machine

  • - Form a solution using the cleaning agent in the bucket. Place the bucket on a mat to prevent staining the floor
  • - Clean the floor thoroughly
  • - Divide the floor on which the stains have to be removed into small portions
  • - Sprinkle a portion with the cleaning solution
  • - Attach the brush used for removing stains, to the machine
  • - Use the machine to remove the stain
  • - Remove excess water using the multi-action mop
  • - Wipe the area dry with the swabbing cloth
  • - Repeat this process until all the stains are removed
  • - Inspect the work. There should be no patches or marks
  • - Clean the brushes and put the machine back in its place

In order to keep the machine in good condition

Dos

  • - Keep the machine erect so that the brushes do not touch the floor when the machine is not in use
  • - Change the direction of the brushes every 15 minutes when using the machine
  • - Check if there is enough electric supply to function this machine
  • - Use the cleaning agent prescribed for the machine

Don’t

  • - Use cleaning agents that cause excess lather or that have high acid content
  • - Use cable wire exceeding 20m in length
  • - Use a brush that is worn out. Change it immediately
  • - Change the direction of the brushes more than 4-5 times in an hour. The motor may burn out due to excess heat

The following points should be remembered before using the stain-removing machine:

  1. Switch on the machine
  2. Check if the indicator light is on and whether it goes off automatically after 5 seconds
  3. If the indicator light does not come on immediately when the machine is switched on, look into the matter promptly by calling the electrician
  4. If the indicator light does not go off after 5 seconds, switch off the motor for one minute and switch it on again. If the light still does not function properly, check the centrifugal switch to see if there is a fault in the switch

Method of changing the brushes

  • - All three brushes should be changed at the same time. If any one brush is damaged, change all the three brushes
  • - The machine should always be kept erect so that the brushes that are fitted on the round wooden frame do not touch the floor
  • - Slowly pull the brushes out one at a time, using both hands
  • - Fix new brushes to the spokes in the wooden frame
  • - The brushes can be used until the nylon bristles are 10-12mm in length. If the bristles are smaller, the brush may become worn out on one side
  • - The direction in which the brushes rotate should be changed every 15 minutes

Points to be remembered when changing the direction of rotation of the brushes

  • - The switch that is used to turn on the machine is the same switch used to change the direction of rotation of the brushes
  • - Turn off the switch and wait for the brushes to stop rotating
  • - Switch on the machine again and the brushes will rotate in the opposite direction

Cleaning different types of stains

The different types of stains are - floor stains, fringe stains, salt stains, stains on the stairway, stains on tiles.

Fringe stains

When swabbing a room or a corridor, the dirt gets deposited at the fringes and the sides of the walls appear dirty. Fringe stains are formed in places between the walls and the floor by the accumulation of dirt. The work of removing fringe stains should be done weekly.

Equipment and supplies

  • - Cleaning agent
  • - Scrubber
  • - Swabbing cloth
  • - Water
  • - Buckets- 2nos.

Method of cleaning fringe stains

  • - Form a solution with the cleaning agent in the bucket. Place the bucket on a mat to avoid soiling the floor
  • - Using a spray bottle, spray the solution in the edges that are to be cleaned
  • - Thoroughly scrub the narrow line between the wall and the floor with the scrubber
  • - The dirty water that results from this scrubbing should be wiped carefully with a swabbing cloth
  • - Rinse the cloth in the bucket of clean water and wipe again
  • - Repeat this process until the edges are sparkling clean
  • - Inspect the work. The edges should be spotlessly clean

Stains on the stairway

The stairway is used frequently by patients, visitors and staff. It therefore gets stained with the dust and soil brought in from outside. There are also stains made by tea and coffee spills. All these stains need to be attended to immediately, and regularly. Stains from the stairways need to be removed weekly.

Equipment and supplies

  • - Scrubber
  • - Cleaning agent
  • - Swabbing cloth
  • - Buckets - 2nos
  • - Water

Method of cleaning stains on the stairway

  • - Form a solution with the cleaning agent in the bucket. Place the bucket on a mat to avoid soiling the floor
  • - Put up a sign both at the top and at the bottom of the stairs saying “Caution: the stairs are being washed. Inconvenience is regretted”
  • - The stairs are used frequently, so it would be best to first work on the left of the steps and then on the right, so that people may continue to use the stairs even when the work is in progress
  • - Sweep the stairs clean, and start the stain removing from the top of the stairs
  • - Wipe the scrubbed portion with a swabbing cloth rinsed in clean water
  • - Repeat this process until all the stains are removed.
  • - Inspect the work. The stairs should appear bright and clean

Salt stains

Salt stains are white salt deposits from hard water that are difficult to remove. They are common in places like the bathroom or on items like buckets and cups, which hold water for long periods. Scrubbing with an ordinary cleaning agent can remove the stains to some extent. However, stain removing stones or polish stones is used to remove these stains completely.

  Special measures should be taken when dealing with marble, since marble is a relatively soft material. Cleaning with a smooth stone or a non-acidic liquid will avoid marble damage.

  In toilet bowls, use “Harpic” (or any stain removing liquid) to remove salt stains. Before using this liquid, the bowl should be cleaned thoroughly as already discussed in chapter 7. Then scrub the bowl with “Harpic”, and leave it for 30 minutes. Flush the toilet and the stains will disappear.

Stains on tiles

Salt water, soap water or dirty water form stains on tiles. In order to prevent stains, the tiles should be regularly washed with soap.

Equipment and supplies

  • - Cleaning agent
  • - A sponge
  • - A bucket
  • - Water
  • - Swabbing cloth - 2 nos.

Method of removing stains from tiles

  • - Make a solution with the cleaning agent in the bucket
  • - Dip the sponge in the solution and squeeze out the excess liquid
  • - Wipe the tile with the sponge, starting from the top and working towards the bottom. A sponge is used to wipe the tile, to prevent scratches
  • - Wash the tiles with clean water
  • - Wash the tiles with clean water
  • - Wipe again with a clean dry cloth
  • - Inspect the work. Tiles that are washed well will be shining clean

Polishing the floor

There are two types of floors - rough and smooth. Rough materials such as cement do not need polishing. Smooth materials such as cuddapah, mosaic, marble and tiles need to be polished at least once a year. Although floors are cleaned and swabbed several times a day, waxing and polishing provides a protective covering and added shine that cannot be achieved through regular cleaning. In fact, polishing reduces the necessity for frequent cleaning because the wax protects the surface from dirt penetration. The material of the floor being polished should be considered carefully before choosing a polishing method because the selection of a faulty method will result in permanent damage.

Equipment and supplies

  • - White mansion polish
  • - Wax
  • - Petrol
  • - Cotton cloth – 2nos.
  • - Small bucket
  • - Small mug
  • - Polishing machine

Method of waxing a floor

  • - Put up a notice, requesting people not to use the area and apologize for the inconvenience
  • - Divide the area to be polished into smaller portions
  • - Sweep and clean one such portion thoroughly
  • - Remove the stains
  • - Check the condition of the polishing machine. If the brushes are not in a usable condition, replace them with new ones (Fig 8.1)
  • - To make a wax mixture, mix the required quantity of white wax and petrol in a bucket to form a smooth paste. The petrol allows for an easy application of wax on the floor, and gives the floor a good shine
  • - Pour a little wax mixture into the small cup.Apply the wax in small circular motions with a cloth
  • - Leave this polish for 30 minutes
  • - Operate the machine on this area


  • - The direction of the brushes should be changed every 5 minutes
  • - Every 30 minutes, turn off the machine for 15 minutes and allow the motor to cool down
  • - Inspect the area that has been polished. A properly waxed floor should not have heavy buff marks
  • - Do not allow anyone to walk over this area for at least 6 hrs
  • - Repeat this process until the entire area has been waxed
  • - Clean and wipe the machine after use
  • - Store the machine in a vertical position so that the brushes are not touching the floor
  • - If waxing is done properly the floor will always appear like new

Machine maintenance

  • - After the work is completed, the machine should be in an upright position so that the brushes are not touching the floor. If this is not done, the bristles will bend and fall off (Fig. 8.2).
  • - Clean the bristles thoroughly with a cloth dipped in kerosene. If this is not done, leftover wax and polish will clump the bristles together and the brush will have to be changed, and it will become difficult to use a brush whose bristles are stuck together


  • - The wax and polish on the bristles can be cleaned using kerosene. Wipe the bristles with a cloth dipped in kerosene
  • - Store the equipment and materials in a safe place

Key points to remember

  • - Confirm the availability of a plug point to run the machine before using it
  • - Wax should be applied in circular motion
  • - Let the wax soak in for 30 minutes
  • - Do not allow anyone to walk over the polished area for at least 6 hours
  • - On completion of the work, keep the machine in an upright position so that the brushes are not touching the floor

Methods of maintaining different types of flooring

Floors made of non-porous material are termed as “sealed floor”, and those made of porous material are “unsealed floors”

Kind of floor Harmful substances Sweeping Cleaning
Cement: Used where need for appearance and infection control are secondary.Highly porous Flammable solvents:Drive soil further into cement
Soaps: react with lime in cement and form a scum which speeds soiling
Alkaline salts: damage cement
For unsealed floor:Use fibre brush For sealed floor use treated or damp mop For unsealed floor:Use neutral synthetic detergent in warm water
For sealed floor: use neutral synthetic detergent in hot water
Wet mopping: To remove stains use poultice treatment of powder cleanser and water.(ie. Prepare a poultice of a mixture of the powder cleanser and water to treat the floor. For oil stains, use whiting and trisodium phosphate (only as a last resort). Rinse after use.
Marble: Can be maintained with very little effort Acids: React with marble and dissolve it
Soaps: Leave a gummy deposit
Ammonia water: Causes yellowing
Compounds containing oil, sand or abrasives Metal: Scratch the surface
Treated mop - use wax base only
Damp mop
Flush with water before cleaning
Use neutral detergent solution
Vacuum or mop up the solution
Rinse thoroughly with clean water and wipe dry.
To remove cleanser build-up use mildly abrasive cleaners periodically.For stubborn stains use the poultice method Scrubbing machines should be used very carefully to avoid scratches.
Terrazzo:Composed of 70% marble, 30% cement. It is smooth beautiful and easy to maintain. Acids Alkaline Salts Soaps Oils Steel wool- leaves rust stains
Paints- epoxies,lacquers etc.
Treated mop - use wax base only
Damp mop
Use only neutral detergent solutions only
Mild abrasives: use with care; marble component is easily scratched
To remove stains use poultice treatment of powder cleanser and water. For oil stains, use whiting and trisodium phosphate, only as a last resort. Rinse after use.
Ceramic Tile:A very durable surface. The cement between the tiles and under the tiles is most susceptible to wear and tear. Alkaline Salts Soaps Oils Steel wool:leaves rust stains
Paints- epoxy,lacquers etc.
Treated mop - use wax base only
Damp mop
Use only neutral synthetic detergents Pre-wet tile before cleaning
Wet mop as required Machine scrub with abrading nylon pads weekly, if necessary
Fine abrasive cleaners:use occasionally to remove firm or stubborn soil. Grit from between tiles is hard to remove.
Slate and quarry tile:Resists staining by grease, soap, food, water Best to use for kitchen areas Tile is impervious
Avoid agents that might damage the cement grout
Treated dust mop Use synthetic detergent for heavy soils
Remove light soil with mop moistened with water.
Magnesite:Extremely durable surface.
Especially serviceable in kitchens and similar
areas-excellent resistance to grease and oils
Excessive amounts of water and salts cause the floor to become porous.

Strong alkaline salts Acids
Treated mop: use wax base only
Damp mop
Damp mop when this method is sufficient.Use neutral synthetic detergents. Rinse and dry after cleaning.
Pre-wet floor to keep solution out of pores.
Use a liquid cleaner for stubborn soil or grease only on sealed floor.
Linoleum: A thermostat material more resistant to temperature changes and indentation than other floorings. Somewhat porous. Heavy furniture
Moisture-avoid frequent cleaning. Allow the floor to dry completely before opening to traffic
Alkaline solutions- they attack the binder
Scouring powders- damage the surface when the floor is wet
Treated mop - use wax base only
Damp mop
Use clear water in as small an amount as possible.
Use neutral synthetic detergents.
Use dry cleaning methods with steel wool pads in non-patient areas.
Vinyl: Good wear resistance, smooth,glossy surface, free of damage by oil and grease
Excellent resistance to acids, alkalies and moisture.
Solvent floor polishes Abrasives, grit, sand- keep the floor well swept Treated mop - use wax base only
Damp mop
Use clear water.
Use neutral detergent
Buff with fine steel wool to restore gloss or to remove stains and heel marks
Use alkaline cleaners only if needed
Hardwood:Not suitable for patient areas, unless plastic coated. If so, it should be treated as vinyl. Water – use only treated or damp mops, vacuum cleaners or solvent cleaners Treated dust mops Use dry cleaning methods such as sweeping
Spot clean with damp mop- use synthetic detergent solution
Rebuff cleaned areas and if necessary, refinish lightly

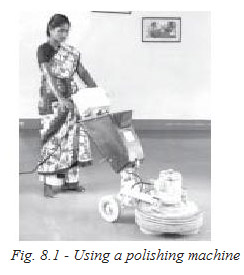
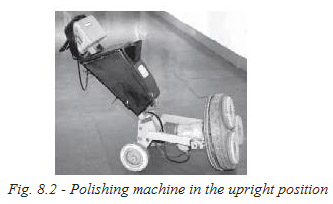
For a demonstration on stain removing and polishing floors, please watch the video of CD

Student exercise

Answer the following

  1. What are the different types of stains? How will you deal with each of these types?
  2. Why is a floor polished? Describe the procedure of polishing the floor