Spectacle Processing
Once a frame is chosen by the patient, the selected lenses have to be fitted into the frame. Some lenses are stocked as readymade lenses (ready lenses) and others are processed only when an order is placed (prescription lenses). This section discusses how to fit the lenses into the frame and also how to process prescription lenses.
Frame and lens checking
Before processing the spectacles it is recommended that the frame and lens are verified against the order form. The following criteria should be checked before proceeding:
- - Condition of the frame
- Center and power of the lens should be checked
- this can be done by neutralisation with a trial set or a lensmeter
- Check the lens for defects such as scratches and waves
- In case of bifocals, check if the frame can accommodate the sufficient reading area and if both lenses have matching segment sizes
- In case of progressive lenses, check if the frame can accommodate fitting height, if both lenses are of the same design and brand
Manual Lens fitting
The lens fitting process involves tracing the frame shape onto the lens and edging the lens along the traced shape. In the manual method, almost all processes are done by hand.
Lens marking
The centre of the lens is marked along with the axis meridian. The frame shape is then traced onto the lens by adjusting its position for PD, centering and segment height. The lens is held against the rim of the frame in such a way that the above criteria are
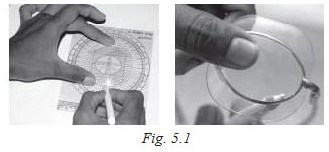
satisfied and then the frame shape is traced with a marking pencil. Usually a slightly larger area is marked to allow for adjustments during edging (Fig. 5.1).
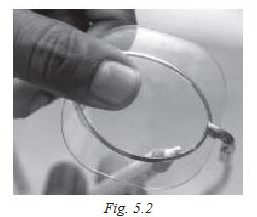
Lens cutting and chipping
When the lens has been marked, the excess lens material around the usable area is grossly cut out by marking the area with a diamond tip and snapping it off. Then a chipper is used to chip off the rest of the lens as close to the marked area as possible. This is done only in the manual edging process; in the automatic edger, the full lens is edged to the required shape (Fig. 5.2).
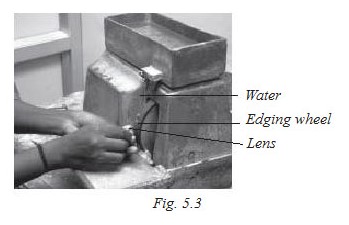
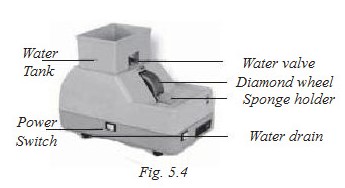
Lens edging
This step involves the finer edging of the lens to the shape of the frame rim and creating a bevel for the lens to be seated in the frame groove. Technological improvements have made this process accurate and easy. The manual edger houses an electrically operated abrasive rotating diamond wheel (Fig 5.4). By holding the lens against the wheel and guiding it, the lens material can be edged into to the desired shape (Fig. 5.3). The edger has multiple wheels, provided for gross edging, finishing and for bevel creation. Water is used to wash away the excess material and to act as coolant during the edging of the lens. The lens is now ready to be fitted into the frame.
Automated lens fitting
Today, with the advancement in technology fully automated fitting is possible with least human intervention. However, considering cost and for practical reasons, a combination of manual and automated processes can be used.
Lens marking and frame scanning
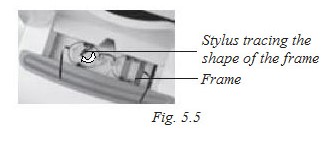
The power of the lens is checked by means of a lensometer. Then, the shape of the frame is traced by a ‘frame tracer’, in which a pin traces the shape of the frame and converts it into digital data. Thus the frame shape can be viewed on a screen. An ‘axis marker’ is a screen displaying the actual frame shape with a graduated top showing the different axes – here the lens is placed and the appropriate lens position is marked (considering centering, PD and segment height) and a block is attached. A block holds the lens in position while the lens is being edged (Fig. 5.5)
Lens edging
- Pattern Edgers: Information from the frame tracer is used to cut out a plastic pattern in the shape of the lens. This pattern is then run along a sensor, the data from which, is used by the edger to edge the lens
- Patternless Edgers: In patternless edgers, the information from the frame scanner is transferred directly to the edging machine, which edges the lens accordingly
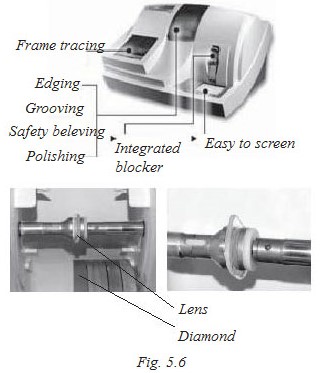
In an automated edger, the frame design has to be given either by information from a frame scanner or in the form of a pattern. The full lens is shaped by a linear lathe (called an ‘edger’) using either a ceramic or diamond grinding wheel or stainless steel blades. The lens is held in position by a chuck. So, a chuck receiver or block is attached to the lens usually by adhesive pads. The block is placed where the geometrical center of the finished lens will be, and the lens is then oriented on the 180 ° axis. The lens is chucked in the edger and held in place by a pressure pad that presses on the opposite side of the lens. The automated edger holds the full lens in position. Before each edging, the lens surfaces are measured to define lens edge thicknesses. Then the lens is held against the appropriate wheel for each process such as edging, finishing, beveling, buffing. Now the lens is ready for fitting.
Lens finishing
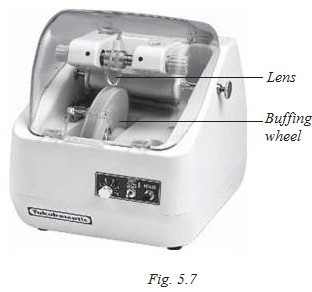
After edging, the lens might need to be cleaned. If the lens is too thick at the edges, it will show outside the eyewire – this gives the spectacles a dull look. This can be rectified by polishing or ‘buffing’ the edges of the lens by holding it against a rotary cotton spindle (Fig. 5.7).
Cleaning
After the lenses have been edged, they are almost ready for tinting, coating, drilling or hardening. Before further processing, they must be cleaned well and inspected for visible flaws.
- Glass lenses: If a non-water-soluble paint has been used for marking the lens during blocking then a solvent such as acetone or alcohol must be used to clean the lens surface. The lens is generally dipped in an open container of the solution and wiped with a tissue or lint-free soft cloth. When no sprays have been used, a solution of detergent will be effective.
- Plastic lenses:Acetone is used extensively for cleaning CR-39 lenses but should not be allowed to come in contact with plastic frame parts. Detergents also clean plastic lenses well. The most effective cleaning method for glass or plastic is an ultrasonic bath. Inspecting a plastic lens that has been alloy blocked may reveal the presence of an indentation at the location of the block. To eliminate the indentation, place the lens in an oven at 200°F for a minimum of 20 minutes. The same method is also used when plastic lens warpage is detected. When an oven is unavailable, the lens may be placed in water near boiling, for an equal amount of time.
Polycarbonate lenses:Polycarbonate lenses are coated to make them more scratch resistant. Also, polycarbonates are very sensitive to solvents. So, use only a liquid detergent. Acetone should not be used.
Lens fitting
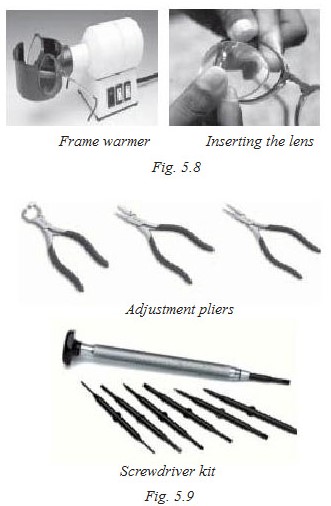
The finished lens is then inserted into the frame. For plastic frames, the frame is slightly warmed with a frame warmer causing it to expand a little and allowing the lens to be snapped in. Lenses can be inserted in metal frame eye wires by a screw (Fig. 5.8).
Once the lens is fitted, the frame has to be adjusted for the pantoscopic tilt, make the temples level, nose pad adjustments etc. This is done with the help of various adjustment pliers, each with a specific function (Fig. 5.9).
Special fitting procedures
Some frames require special fitting techniques. The lenses can also be enhanced with special methods. This section describes special fitting techniques and lens tinting procedures.
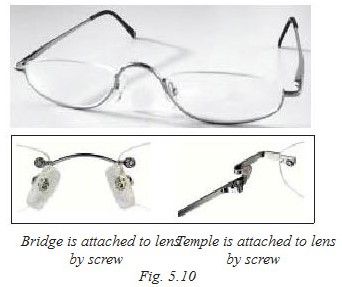
Fitting rimless frames
Rimless frames are also called 3-piece frames. As there is no eye wire, the frame comes in three pieces: the two temples with hinge and the bridge with the nose pads. The three pieces are connected by the lenses only. Holes are drilled into the lens and the frame is attached by screws or clips. Thus, these frames require fragile handling (Fig. 5.10).
Chamfering
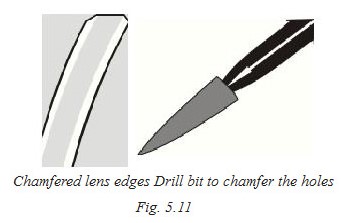
The lenses must be prepared for rimless frames. After edging the lenses are flat edged. It is important that their sharp outer rims be slightly beveled in order to prevent flaking or breaking when the frame is attached. This is called "touching off" or "chamfering". This beveling is made at approximately 40 degrees to the flat edge of the lens and around 0.5 mm. in width (Fig. 5.11). The holes created by drilling must also be chamfered. This is done by beveling rims of the holes with a chamfering point - a small, plumb-shaped carborundum drill bit. Rimless spectacles are cosmetically more appealing when their lens edges are polished.
Drilling holes
Twist drills are used to drill holes in plastic lenses. However, when using any hand drill, be sure to start the hole with a sharp-pointed object otherwise the bit will slip off and scratch the lens.
The following should be ensured while drilling the holes:
- - Always ensure that the cylindrical axes are marked
and the lens is in proper position before you begin
the drilling operation.
- Do not drill too close to the lens edge. You should allow at least 3 mm from the hole to the edge of the lens. The plastic may fracture if the hole is drilled too close to the edge.
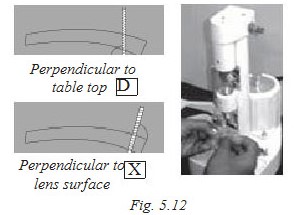
Usually the hole should be drilled perpendicular to a flat surface (for example, the surface of a flat table top) rather than being oriented to the lens's surfaces
- - Do not drill the holes too large. Oversized holes
will cause the lenses to wobble.
- Do not drilling non-stop all the way through the lens. Lenses must be drilled half-way and then turned over for completing the drilling. Otherwise, the hole will flake around the edges. Begin drilling with the concave side up. After drilling halfway through the lens, reverse it so that the drill bit goes from the convex side, with the hole from the convex side meeting the unfinished hole from the concave side.
Fitting the screws
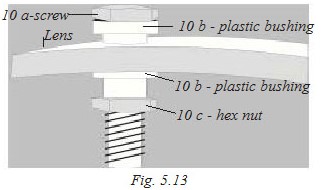
Now that the lens holes are drilled, the screws attached to the frame are inserted into the holes and a nut is used to fasten it – a plastic bushing is sometimes used. Usually the manufacturers give a long screw to accommodate high power lenses. Thus it is sometimes necessary to cut off the excess length of the screw.
- - Avoid cutting the screw flush with the nut. This leaves the screw with a sharp end.
- Do not file down the ridge of the screw. This removes the cutting and leaves a flat, rivetless overhang, and the screw loosens quite easily.
- Cut the screw about 0.5 mm from the nut.
- Dimple the center of the screw end. With a pointed tool, punch a tiny depression in the center of the screw end to achieve a "reverse rivet" effect.
- Apply a sealant (for instance, colorless nail polish,or a commercial liquid adhesive).
Fitting half-rimless frames
To fit lenses into semi- or half-rimless frames, the lens should be ready to receive a nylon wire that runs along its lateral edges and holds it into the frame. Thus, after the lens has been edged a groove is cut into the edge of the lens by means of a grooving machine. Thus even while processing it is important
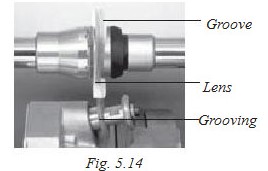
to ensure that the lens is thick enough for the groove. If it is too thin then it is prone to chipping as half the rim is not protected by the eyewire (Fig. 5.14).
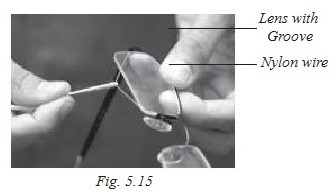
Once the grove has been cut the lens is held in place and the nylon wire (which is attached to the frame eyewire) is pulled over the outer edge of the lens and placed into the groove with the help of a strip (Fig. 5.15).
Tinting process
Plastic lenses are absorptive and can be tinted in a multitude of shades. They can be highly tinted for cosmetic purposes or for relief from glare. Light brown or gray tints seem to be more effective in
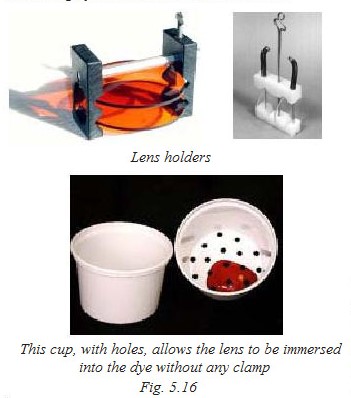
controlling glare problems than cosmetic tints such as pink or blue. However antireflective coated lenses are better in reducing glare. These lenses are normally dipped into a heated dye and the tint is slowly absorbed into the plastic. To make a darker tint, the lenses are simply left in the liquid longer. For the best results replace the dyes frequently to produce accurate tint colors. Using filtered or distilled water further enhances the color and absorption of the tints
Polycarbonates are not very porous and so generally absorb only light to medium dark tints. Over heating or attempting to tint a polycarbonate lens to a dark tint may damage the lens - the surface will split.
Protection from UV which is important for all lenses meant for sunglasses, is obtained by immersing absorptive lenses into a heated solution of UV filtering chemicals. Polycarbonate and some high index lenses inherently provide UV protection.
Tinting methods
- Solid tints: In these the tint is distributed evenly throughout the material. These were the majority of tinted prescription lenses. Nowadays, only photochromatic lenses and some protective filters use solid tints. A significant advantage of solid tinting is that scratches do not affect the performance, making them safer when viewing dangerous sources of light such as welding arcs. The principal drawbacks of solid tinted lenses are that a different stock lens is needed for each color and that the depth of tint depends on the lens thickness, hence high prescriptions look odd darker in the middle for plus lenses, darker at the edge for minus lenses.
Surface tinting
In this method the tint is applied only to the surface of the material. Thus, there is no need to stock a range of lenses for each power with each color and tint depth. Tinting can be done by the dispensing optician once the order is placed.
- Glass lenses: The tint is applied by a vacuum coating process, in which the tint material is evaporated in a vacuum chamber then re- condensed on the cooler lens surface. They are normally on a single surface, so scratches can affect transmission.
- Plastic lenses: Plastics lenses are usually tinted by immersing a clear lens into a bath of dye solution. The dye penetrates evenly, but not very deeply, over the whole surface of the lens and a uniform tint is produced. If the lens is lowered gradually into, or raised from, the tinting bath, then more dye will be able to penetrate the part of the lens which is in the bath for the longest time and this will become darker. It will therefore have a “graduated" tint. Tinting both surfaces is advisable as surface scratches only damage the tint on one surface. Photochromatic dyes are usually absorbed only into the front surface in a process requiring much more control than ordinary dip- dyeing.
Tinting patterns
- Equitinting:Equitinting refers to applying a uniform tint and tint depth through out the lens. Surface tints can achieve this effect easily. But in solid tints, it is seen that the tint is darkest at the thickest portion of the lens. Though done rarely, these lenses can be equitinted by laminating a solid tinted lens along the lens.
- Gradient pattern: This usually describes a tint which is dark at the top and light at the bottom, but is also applied to any tint which is deliberately varied over the lens area in either darkness or colour. This allows the wearer to perform near vision tasks like reading which may require more light. The lens is slowly lowered (upside-down) into the dye. Since the top of the lens enters the die first and is withdrawn last, it spends more time in the dye and becomes darker than the lens bottom.
- Double Gradient Pattern: This pattern has a darker tint at the top and bottom of the lens, and a medium tint in the center of the lens. Double gradient tints are good for skiers; because glare coming from the sun above and the snow below is heavily blocked but a clearer viewing area is present in the middle of the lens.
Gradient tints are most attractive when the tint gradually lightens to a clear appearance rather than coming to an abrupt stop.
Choosing tint color
As white light is made up of many colors, choosing tints carefully can improve the performance according to specific environments and activities.
- Pink: A rose tint/ is cosmetically appealing, soothing to the eyes, and seems to provide a degree of relief when the wearer is working in brightly lit offices. A rose tint is often recommended for computer users to help reduce eyestrain and glare.
- Yellow: A yellow tint makes objects appear sharper against a blue or green background. Blue light can create a kind of glare known as "blue haze". Yellow tints are sometimes marketed as "blue blockers" because they are fairly opaque to blue light. Yellow tints are good for foggy conditions. It is used by pilots. Yellow should not be used for any activity that depends on accurate color perception.
- Brown or Amber: Brown and amber tints work well in variable light conditions and provide good contrast because they filter some blue light, although not as strongly as a yellow tint. Brown lenses are good general purpose lenses and for sports
- Green:Green tints filter some blue light and enhance contrast in low-light conditions. The human eye is most sensitive to green wavelengths of light so green tints offer the highest contrast and greatest visual acuity of any tint.
- Grey:A grey tint provides good protection from glare with minimal distortion of colors. Grey is sometimes referred to as a true-color tint. It is a good choice for general use and driving. Grey is the most popular sunglass tint.
- G-15:This sunglass tint is sometimes called the "Ray-Ban" tint. It is essentially a combination of a grey and green tint that blocks 85% of the light.
- Purple:Purple is a balanced color which provides natural color perception while shading the eye.
- Blue:Blue is a good fashion tint in lighter shades. It is not advisable for outdoor use, as it increases glare. Alternatively use a brown or grey lens combined with a blue mirror coating.
Achieving the right tint
Dyes are now readily available for each colour. But they can also be prepared by a combination of tints. A few combinations for standard colours are given here:
- Orange: Dip in Red and then Yellow
- Dark Brown: Dip in Brown and then Gray
- Tru Colour: Dip in Gray and then Green or Blue
- G-15 (Ray Ban Tint): Dip in Gray and then Green
If the resultant tint is wrong, here are ways to correct it:
| Desired Lens Tint | Result to be corrected | Method of correction |
| Gray | Too Green Too Purple Too blue Too brown Too yellow |
Dip in Pink Dip in Yellow Dip in Brown Dip in Blue Drop in Blue then Red |
| Green | Too yellow Too blue Too brown Too gray |
Dip in Blue Dip in Brown or Yellow Dip in Blue Remove the color |
| Rose | Too blue Too red Too brown |
Dip in Red Dip in Violet Remove the color |
| Brown | Too red Too purple Too gray Too green Too blue |
Dip in Gray or Blue Dip in Yellow Dip in Yellow Dip in Red then Blue Dip in Pink |
| Other tips | Resultant color is poor Stress marks seen on thin lens Dark stray marks Uneven Gradient dividing line Light areas seen in the tinted lens |
Contaminated or old dye; Replace Tint Clamping pressure in holder too high; Loosen it Lens needs to be properly cleaned before dyeing Caused by rapid boiling of dye Lenses may have come in contact with each other or the holder |
- Purple: Dip in Blue and then Red
- Autumn Brown: Dip in Gray and then Brown
- Winter Gray: Dip in Gray and then Blue
Dyeing temperatures
The temperature of the dye pots is important when considering the time needed to tint lenses to the desirable shade. Most tints absorb into the lens materials quickly if the dye pots are maintained at a temperature between 175° - 190° F. Usually the temperature is recommend by the dye manufacturers.
Achieving depth of the tint
The depth of the color of a tinted lens depends on the length of time that the lens is immersed into the dye, the lens material and the age of the lens. Dark tints are achieved by immersing the lenses into the dye for longer periods. Dark tints can take up to 20 minutes or longer before reaching the desired depth of color. Sometimes lenses tint unevenly: one lens has darker than another or each lens is a different color, even though they were immersed into the same dye for equal periods of time. This is common while tinting old lenses. Do not tint old lenses especially if they are scratched - the dye disperses more into the scratches, causing abrasions to be darker than the rest of the lens.
Longer a lens is immersed into a heated dye, greater the chance of damaging the material. Heat damaged lenses may appear warped, crazed (the surface is cracked), or waved (the surface appears to have melted). These problems are more frequently seen in high index or polycarbonate lenses. These lenses are more safely tint if dyes are maintained at a lower temperature and if the lenses are continuously cooled during the tinting process – by alternately dipping the lenses between the heated dye and cool water.
Mirror lenses
A mirror coating is applied to the outside of a lens to deflect reflected light. The outside of the lens looks like a mirror but the wearer experiences only the tint.
Fancy photochromatic
Some plastic photochromatic lenses are now available in unusual colors. These lenses are one color in the shade, but change to a completely different color when activated by UV. There are teal-blue lenses that change to green, yellow lenses that change to orange and red lenses that change to purple.
Lens grinding procedures
Today, the manufacture of plastic eyeglass lenses far exceeds the manufacture of glass lenses, but the process has remained much the same for both types. Plastic as well as glass lenses are produced by successive stages of grinding, fine grinding, finishing and polishing. In the past, opticians relied on separate optical laboratories to produce spectacle lenses. Today, there are a number of full-service optical outlets that produce lenses for customers on-site. However, optical outlets do receive lens "blanks" or glass or plastic pieces made almost to the lens size. These have to be “surfaced" to get the right front and back curvatures that will result in the desired power. Today, one-side finished blanks are available: these come in different curvatures and near vision addition powers on the front of the lens and only the back surface needs to be surfaced.
Blank selection
The blank selected should be of the ideal thickness, diameter and correct addition power. For bifocal lenses, the blanks come with a prefixed addition power button which is fused to the base lens. The addition power and the base curvature of the lens are usually printed on the blank by the manufacturer. For the given prescription the blank with the least possible thickness and diameter should be chosen. Thus, the resultant lens will be thin enough to look good but should not be too thin. And if the diameter is less, then less material is wasted during edging. Thus diameter can be chosen according to the frame size – its effective diameter or diagonal of the eyewire.
Manual surfacing
Manual surfacing if at all used is restricted to production of glass lenses. The glass blanks need to be surfaced on both sides. The required curvature is generated by a series of grinding steps where the excess material is removed by abrasion.
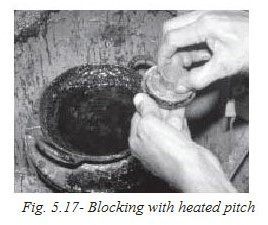
Blocking
To hold the lens firmly during the grinding process, a metal button is attached to the lens. This is called blocking and pitch is usually used as an adhesive. The blank must be accurately centered considering axis and segment height and the pitch must be spread evenly over the button and the blank must be horizontal when attached. If not, then the lens the lens will have uneven thickness at the edges and this will cause a prism effect. Sometimes, if it is given in the prescription, a ring is used to intentionally tilt the lens so as to induce prism.
Roughing
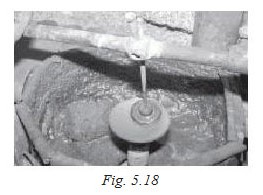
The laboratory has a range of tools or dies each of which corresponds to a specific prescription power. Also different tools are necessary for each surface. A spindle machine is used for surfacing. The appropriate tool is attached to the spindle and rotated. The blank is moved over the tool which grinds it. Sand emery (grain size = 0.3 mm) or carbora dam is mixed with water and fed to the tool for abrasion. A certain amount of pressure may be exerted while roughing the lens to enable the emery to cut rapidly. But care should be taken to avoid chipping the lens edge. This is done till the required curvature is achieved. This is repeated for the other surface.
Truing
After roughing, the tool and button are washed in water to remove any abrasive. The same process is repeated but sand emery (grain size = 0.075mm; emery grade 302) and fine grade abrasives like corundum or Aluminum Oxide are used for truing. This is continued till the pits caused by sand are removed completely and the surface is smooth. The tool and the blank is again washed with water for the next step.
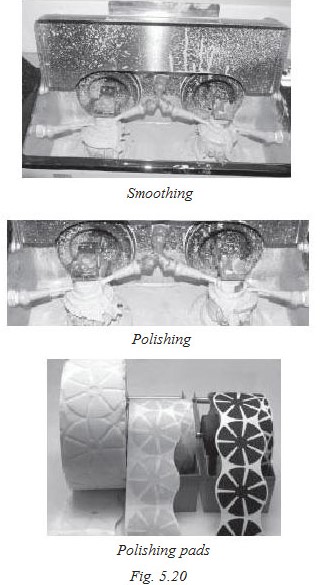
Smoothing
Two things are accomplished during smoothing. The curve must be made true and the lens surface must be made capable of taking a good polish. Sand emery (grain size = 0.01mm; emery grade 303) or Aluminum oxide is used. Here less abrasive (1 part powder + 3 parts water) is used to prevent pitting. It is better to have both tool and lens rotating. At the end of smoothing, the lens is washed.
Polishing
Here the tool is covered with adhesive polishing pads made of cellulose fiber, taffeta silk, wool, linen and sometimes paper. The polisher is thus classified as a paper polisher or a cloth polisher. ‘Rouge’ or red oxide of iron is used for polishing. Cerium oxide may also be used – it gives a perfect polish much faster but is expensive. Other polishing powders are White Tripoli pumice and putty powder. Water is poured during polishing to act as a coolant to prevent the lens from melting or turning brown in the heat.
De-blocking and cleaning
The lens is separated from the block by knocking off - a sharp tap is given to the block with a wooden hammer. The block can also be melted off. It is generally favored that the lens and block are cleaned by dipping in kerosene or mentholated spirit to remove the pad.
Automatic surfacing
Blank and tool selection
When the optical prescription is feeded to a computer, a printout with specifications necessary for producing the required lens is obtained. Based on this information, the technician selects the appropriate plastic lens blanks.
Axis marking
The appropriate blank is placed under a lensmeter, to locate and mark the optical center. If the prescription has cylinder power, a line is marked on the front of the lens to define 180º, and then another line is drawn that matches the desired axis. If there is a segment, the segment edge is used as the 180º line. The optical center of the lens should be made slightly above the segment edge; so, the line is marked the appropriate distance.
(Note: When there is no segment or induced prism, the lens may be left unmarked and the cylinder axis is set during edging.)
Blocking
The lens has to be attached to a metal block which will hold the lens during the grinding process. This is attached by a metal alloy that has a low melting point; so it can be attached and removed by heating it to a relatively low temperature which will not affect the lens.

While blocking one-side finished blanks, the finished front surface needs to be protected from the block by an adhesive tape called the “surface saver tape". The block is attached after the tape is stretched over the finished lens surface.
Grinding
The necessary curvature is obtained by a curve generator which cuts the lens surface to the specified extent; these settings are manually set for each lens in a semi-automatic generator; and simply fed by keyboard or by touch-screen to a CNC machine. The curves are set on the machine and the lens is generated or ‘ground’. This step can be operated by hand in a curve generator, where the operator manually sweeps the quill or grinding wheel across the lens till the desired lens thickness is achieved. If the lens gets too hot during the operation it may warp or tear, so it is cooled by water, which also washes away the cut material, called scarf. This can also be done
automatically by a CNC machine which performs the dry cutting within a few seconds. In this process, lens thickness is determined by:
- Curve type: plus or minus
- Lens material: depending upon the strength of the plastic it can be made thinner
- Other considerations:e.g., safety glasses are made thicker than lenses for daily use
Smoothing and polishing
After grinding, it is seen that though the appropriate curvature is achieved the surface is still rough and not suitable for spectacles. Hence, this has to be smoothed and polished. A metal die or tool is a mould corresponding to the required optical prescription of the lens – it must have reversed, matching curves (e.g., +2.00 base/+2.50 tool for - 2.00/-2.50 lens). Self-adhesive rough sandpaper is attached to the die and this is rubbed against the lens surface in a circular motion by a smoothing machine for one minute, in order to smoothen it. This is once again repeated with a slightly smoother pad. Meanwhile the lenses are kept cool and cleaned with water.
Now, polishing is done by using a very smooth pad on the die for five minutes while a polishing compound consisting of aluminum oxide, water, and polymers flows over the lenses. The lenses are removed from the finishing machine, and the metal block is gently detached by immersing the blocked lens into hot water. The tape can be removed from each lens by hand. The lenses are now ready for edging.
Student exercise
Answer the following
1. What should be checked before fitting the spectacle.
2 What are the equipments needed for fitting by manual and automated methods.
3. How is a lens marked before manual fitting.
4. What are the different parameters to be considered while surfacing.
5. What are the differences and similarities between manual and automated surfacing.
6. How are different tints and tint patterns achieved.
Choose the correct answer
1. Rimless frames are fitted by
a. Nylon wires
b. Using adhesives
c. Screws and clips
d. Fitting bevel into the groove
2. Buffing refers to
a. Edging the lens
b. Polishing the lens edges
c. Cleaning the lens
d. Surfacing the blank
Answer if True of False
1. While edging for half rimless frames the lens edges should be beveled (True / False)
2. Ray - Ban Tint is achieved by dipping in green then grey (True / False)