Fundamentals of Out-Patient Services
History taking
In any health-care facility, for a doctor to make a diagnosis or diagnoses, a detailed and accurate history should be taken from the patient. This history is the story of the patient's medical disorders. In an ophthalmic setup the OA collects the history. A history is taken by asking a series of specific questions linked in an orderly sequence in order to help the ophthalmologist diagnose the patient's condition.
Two types of patients are seen in eye hospitals
A. The patient who desires a routine ocular examination combined with a refraction and
B. The patient with symptoms of ocular disorders.
The OA should be able to determine which category the patient is in, collect the appropriate data precisely, and know what information is relevant to the case. Sometimes a patient with multiple systemic disorders may say that they are in excellent health overall, but then, when questioned, may answer that they are taking pills for hypertension, iron tablets for anemia, or injections for diabetes. The patient may not connect a general systemic disorder with their ocular problem. Systemic diseases can cause both major and minor complications in the eye.
It is very important to note here that the history must be very simple, clear, and accurate. Following stories illustrate the importance of taking an accurate record.
Story (with systemic ramifications) regarding insulin / penicillin
The OA asked the patient if she had any allergic reactions to medications. The patient replied, "Yes, penicillin." The OA recorded it in the patient's chart as, "Insulin". After surgery the patient developed an infection and penicillin was prescribed by the doctor. He was not aware of her allergy because of the incorrect history record. The patient almost lost her life due to this error. Her relatives wanted to know why the doctor had not observed her allergy and they checked the record and found out that insulin had been mistakenly recorded instead of penicillin.
Story (with ocular ramifications) regarding diamox / diuril
The OA asked the patient, " What medication are you now taking? " The patient was taking diamox for a severe glaucoma condition. But the OA recorded it as diuril in the chart (which is also a diuretic, but it does not lower intraocular pressure like diamox). After surgery the doctor ordered the patient to continue with the regular medications. The OA looked at the chart, and had noted Diuril (not Diamox) and followed the doctor's orders. The patient's intraocular eye pressure increased over a period of several days causing some glaucomatous damage (to the optic nerve and thus causing the vision to decrease). Finally the error was discovered and appropriate medication was given. Damage to the optic nerve had resulted from this mistake which was irreversible.
History taking must be accurate and to the point, so use these methods to ensure that you are listening carefully to the patient.
- Restate the patient's answer to your question. They can clarify the answer if misheard or if a similar sounding medication is put on the chart. We are dealing with people's lives, so it is vital to get all information right in their record.
- Take notes on a paper as the patient tells you about their problem. Look them in the eye/Look at their eyes and talk to let them know that you are interested and concerned about their problem. Organise the information in a chronological order (arranged in order of occurrence). The doctor will appreciate this very much.
- Write down the pertinent facts on the medical form in the order of occurrence. Leave out all the unimportant information that the patient may tell you. Sometimes the patients will go into great detail and much of this may not be relevant to the chief complaint. Sometimes the patient needs to talk to someone, therefore, be polite but guide the patient back to the chief complaint. The doctor will be so appreciative if you can let the patient unwind with you and not take his valuable time.
It is important that the OA make the patient feel comfortable as only then will the patients share their complaints. The OA should not refrain from asking a particular question because it appears to be too private or embarrassing. If the history is conducted in a frank and professional manner and the questions are posed with tact and good taste, the patient will reveal even the most private matters, just as they would remove a shirt for chest examination. Some patients may refuse to speak to anyone except the physician about their eye problems. This is the patient's privilege. These patients should be treated even more carefully and tactfully. The OA should not attempt to interpret a statement made by the patient, as this will waste the valuable time of the ophthalmologist.
Elements of a case history
There are four types of history collection, problem-focused, expanded problem-focused, detailed, and comprehensive. All of these will include some or all of the following elements
1. Chief complaint
The patients will tell about their ocular problems and describe their symptoms and in the case history this usually should be written out in the patient's words. The OA should be able to determine from the outset whether a case is an emergency, and how vital it is that the patient sees a doctor soon.
2. Present ocular history
To help the patient describe the chief complaint, the OA can ask the following questions:
- What are your symptoms?
- When did the symptoms start? Start with the distant time (for example 1-1/2 years), and work toward the present. Complaints can change, such as light flashes, then floaters, then half of the vision is gone and the patient only sees a black shadow in half of his visual field.
- Does the symptom seem to be getting worse?
- Are you taking any eye-related prescription medications or drops? What type, dosage and frequency?
Depending on the patient's answer, the OA can ask for a chronological description of the development of the patient's present illness. This may include the following elements:
- What is the status of your vision?
- When was the onset of your symptoms?
- Describe your present symptoms.
- Has there been any previous treatment of the symptoms?
To derive these elements the OA can ask the following questions
- Have you experienced any change in your vision? Have you noticed a decrease in distance or near vision? Has your vision been affected in one eye or both eyes?
- Did the symptom start all of a sudden or gradually?
- Is it stationary or progressive?
- Where exactly is the problem?
- Are symptoms constant or just occasional? If it is occasional, how long do they last?
- What is the severity of the problem? For example, if the problem is pain, ask whether the pain is sharp or dull
- Does the symptom get worse with any other activity? Do the symptoms interfere with your work or other activities?
3. Past ocular history
- Any previous eye injuries or diseases? What type? When were they first diagnosed and treated? What was the duration?
- Any previous eye surgery? Trabeculotomy for glaucoma, laser procedures for diabetic retinopathy)? When?
- Do you wear glasses or contact lenses, and how is your visual acuity with your RX / CTL?
4. General medical history
- Are you suffering from diabetes, high blood pressure, heart disease, asthma, or another medical condition?
- What medicines you are taking (Insulin, Digitalis, Eltroxin, Diuretics, Aspirin, etc.)? Ask them to show the medicine if they have. Sometimes they will not know the name of the medication. They may say the colour or shape of the tablets. Do not assume the name of the medicine and come to a conclusion. If the patient is unable to tell the name of the medicine, write the same in the record.
- Any previous general surgery?
5. Family medical history
- Do any diseases run in your family? Do you have blood relatives living or dead who have had blindness or any eye disease?
- High blood pressure? Heart disease? Strabismus? If diabetes, then type and onset?
6. Occupation
7. Allergies
- Do you have allergies? If so, what are the possible causes of your allergies? Are you taking oral or topical drugs that may be allergic to you?
Specific complaint examples
1. Patient exhibits red eye(s)
Questions to ask
- How long has the eye been red?
- Has there been any trauma to the eye?
- Has any foreign substance been introduced to eye (shampoo, dirt)
- Do you have any allergies?
- Do you have any pain? How long?
- Do you feel an irritation, or do you sense a foreign body in the eye?
- Does your eye itch?
- Do you have increased sensitivity to light (photophobia)?
- Is there any discharge from the eye? If so, what colour (clear, white, or yellow-white)?
- Have you experienced a decrease in vision?
- Has the eye been treated at all for the redness?
- Do you have a headache, or vomiting?
- Have you taken any medicine?
Diagnoses to consider
- Conjunctivitis
- Iritis
- Angle-closure glaucoma
- Contact lens overwear
- Dry eyes
- Postoperative iritis
- Pingecula
- Pterygium
- Subconjunctival haemorrhage
- Penetrating foreign body or injury (if patient is carpenter or lathe worker)
- Blepharitis
- Trichiasis
- Foreign body in eye (dust or stone particles, flying iron dust)
2. Patient complains of decreased vision
Questions to ask
- How long has your vision been affected?
- Which eye / If both eyes which eye is worse
- If unilateral when did you notice the reduction in vision?
- Has the decrease been gradual or sudden?
- Has your near vision or distance vision been affected (or both)?
- Whether the decreased vision occurs during the day or at night (or both)?
- Has it been getting worse?
- Are you in pain?
Diagnoses to consider
- Cataract(s)
- Old prescription
- Onset of presbyopia
- Optic neuritis
- Retinal detachment
- Diabetic retinopathy with CSME
- Vitreous haemorrhage
- Diabetes-related eye problems
- Unilateral-amblyopia, CSR, etc.
Tips for Winning the confidence of the patient
As stated previously, it is very important that the OA make the patient feel comfortable, as only then they will share their complaints without inhibition.
To win the patient's confidence, it is important that the OA be cleanly and neatly dressed, and that they handle the patient patiently and compassionately, being attentive and listening to the patient's symptoms without interrupting them. Here are a few easy but important ways to exhibit your concern:
- Introduce yourself (My name is .................., I will be working with you for a few minutes to record your ocular problem).
- Explain that in order to get the best care and treatment from the doctor, you need to record a few important facts about the problem.
- Make sure your attitude toward patient is friendly; (be sensitive and smile frequently) Treat them cordially, so that they feel you are interested in them as a total person and not just for their eye problem.
The OA can improve their interactions with the patients by assuming that someone they love most or respect most is always at their side watching and listening to their interactions with others so this will make a difference in their daily behaviour towards other people. If you take this assignment to heart, it will change your attitude and you will become a more sensitive and positive thinking person with whom people will enjoy associating. It will make a difference in how you treat your patients.
Summary
A systematic order should be followed in taking an adequate history.
Key elements of history taking
- Identify the chief reason the patient seeks an eye examination.
- Identify any secondary problems the patient has that are related to the eye.
- Identify any systemic or general illness the patient presently has and any medication being taken.
- List past ocular disorders and/or operations.
- Determine if the patient is wearing contact lenses or spectacles, and if so, how old they are and when the last eye examination occurred.
- Be brief but also go into detail with any specific ocular problem that arises. General questions regarding abnormalities may be important, such as time and duration, family involvement, and so on.
- Record any previous treatment and the response.
- Never talk ill about any treatment taken outside, or about the doctor who has treated the patient.
- Always ask for referral letters.
Medical terminology
| VA | - Visual acuity |
| RX/CTL | - Treatment/Contact lens |
| BP | - Blood Pressure |
| BS | - Blood Sugar |
| FB | - Foreign Body |
| DWSCTL | - Daily-Wear Soft Contact Lens |
| CSME | - Clinically Significant Macular Edema |
Student exercise
I. Write true or false?
- History taking is a confidential experience with the patient and the OA who is involved. (True/False)
- The most significant question is what medication are you taking. (True/False)
- The patient should be allowed to speak freely about all their problems. (True/False)
II. List and describe the essential elements of a complete problem oriented medical case history.
External examination of the eye
After the OA takes preliminary information about the patient and their disease, and records it in the case sheet, the OA begins an external examination of the patient's eye.
First they ask the patient to close the eyes and throw light on each eye to rule out lagophthalmos or improper closure of eyelids.
The OA should begin the external examination of each eye by systematically noting the symmetry of the orbit, the lid margins, the conjunctiva, the lacrimal apparatus, the sclera, the cornea, the iris, the pupil, extra ocular movements, squint and the lens. They should check the primary position of the eye ball and if there is deviation or diplopia, and check ocular motility.
Symmetry of orbits
In proptosis, there is protrusion of the eye globe. In such cases the upper lid is often retracted and there is exposed sclera above and below the cornea. Another method of determining the presence of proptosis is to stand behind the patient, draw their upper lids upward, and note which eye appears to bulge the most. The ophthalmologist may record the degree of proptosis with an instrument called an exophthalmometer.
Eye lashes
Cilia, or eyelashes, are hairs on the margins of the lids. They are located in two rows, totalling about 100 to 150 cilia on the upper lid and half that number on the lower lid. The bases of these cilia are surrounded by sebaceous glands (Glands of Zeiss). Infections of these glands result in a common stye. The average life of the cilium is from 3 to 5 months, after which it falls out and a new one grows to take its place. If the cilium is pulled out, the new one replacing it reaches full size in about 2 months. If the cilia are cut short, as is sometimes done preceding surgery on the eye, the growth is rapid and lashes may appear normal in a few weeks.
Lid margins
The lid margins should be observed for any redness, scaling, or discharge, indicative of blepharitis. The position of the lid margin should also be noted. It should be tight against the globe and not sag outward (ectropion) or inward (entropion). The punctum on the medial aspect of the lower eyelid should not be visible without depressing the lower eyelid. The more common affections of the lid margin are styes, chalazions, and growths. Sometimes posterior misdirection of cilia called trichiasis may be seen.
Conjunctiva
The bulbar conjunctiva is readily visible. The caruncle is seen as a fleshy mound of tissue at the inner canthus. The palpebral conjunctiva of the lower lid is seen by depressing the lower lid while the patient looks up toward the ceiling. The peripheral conjunctiva lining the upper eye lid can be seen only by everting the upper lid. Eversion of the upper eyelid is carried out by grasping the eyelashes of the lid between the thumb and index finger and turning the eyelid over a tooth pick or applicator. It is important that the patient should be asked to look downwards to relax the levator muscle. With eversion of the upper eye lid the tarsal conjunctiva is visible and the meibomian glands running vertically from the lid margin are easily seen. The bulbar conjunctiva should be inspected for growths such as pterygium and pinguecula. The palpebral conjunctiva should be inspected for follicles, discharge, pustules, chalazion, and hordeolum internum. Look for bleb.
Lacrimal apparatus
The presence of tearing in the absence of any other signs of inflammation of the lacrimal sac may be caused by a small, smooth elevation in the lacrimal fossa between the inner canthus and the nose. Pressure inward on this area will cause the contents of the lacrimal sac to be expressed through the puncta onto the conjunctiva. It should be noted whether the contents from the lacrimal sac are tears, mucus, or purulent material. Deficiency of tears is best measured by Schirmer test.
Sclera
The normal sclera is visible beneath the conjunctiva as a white, opaque, fibrous structure. Blue discolouration of the sclera may be normal in a very young child because of the sclera's thinness and the underlying prominence of the dark choroid. Blue discolouration in an adult invariably indicates a pathologic condition; it may signify a tumour, a thinning of the sclera with a protrusion of the underlying uvea (Staphyloma), or a nevus. In the elderly the sclera may appear yellowish because of the presence of fat and other degenerative substances.
Cornea
The normal cornea should be smooth, shiny, and free of irregularities. In children when the corneal diameter is 12 mm or more and the cornea is hazy it is indicative of congenital glaucoma. In elderly people a white ring is frequently present near the corneal periphery. This creamy white ring is due to the deposition of lipid and is called arcus senilis. The cornea is normally free of blood vessels. The presence of blood vessels indicates a pathologic condition and disease. Corneal edema can often be seen with the naked eye because of its characteristic ground-glass appearance. Corneal opacities may be detected by oblique illumination with a small flashlight. Any acute white lesion in the cornea with conjunctival congestion, one should suspect corneal ulcer.
Corneal sensation should be tested with a small wisp of cotton directly applied to the cornea. Explain the procedure to the patient. In this test the patient is instructed to look up. Normally a blink response should occur, if the corneal sensation is normal. It is important that the patient should not see the cotton approaching the eye, as the visually- evoked response of seeing a foreign object approach the eye will also cause a blink response. Because of the wide range in individual response, comparison of the corneal reflexes of both eyes is most useful. Loss of corneal sensitivity follows herpes simplex virus infection and brain disease involving the fifth nerve.
Iris
The iris is normally brown in colour; usually the colour is the same in both eyes. A difference in the colour between the two irises (heterochromia) may be indicative of a congenital abnormality, iris tumour, retained intraocular foreign body (siderosis), or old iritis.
The iris is normally well supported by the underlying lens. Tremulousness of the iris, or undulating movements of the iris structure, is called iridodonesis. It is seen in subluxated lens, posterior dislocation of lens and surgical aphakia. It is best seen by asking the patient to look quickly from one point of fixation to another.
Anterior chamber
By shining a small pen light from the side, one can make an estimation of the depth of the anterior chamber. If the anterior chamber is shallow, it should be so recorded. Never dilate eyes with shallow chamber. It should be recorded in the case sheet in Red ink.
Pupil
The OA can test pupillary function with no special instruments except a small light. The following points should be noted in the examination of pupillary function.
Pupillary reflex
For assessment of the direct light reflex, the patient should be seated in a dimly illuminated room, with the light evenly distributed throughout the room and close one eye. Then a small ray of light is brought from the side and shown directly on to the pupil of the other eye . The normal direct light response causes constriction of the pupil on that side.
For assessment of the consensual light reflex, light is directed into one eye while the other eye is observed. An intact consensual response to light causes constriction of the pupil of the non-illuminated eye.
Normally, where an object is viewed close at hand, three associated reactions occur; convergence of the eyes toward the object, accommodation, and pupillary constriction. These three reactions should not be considered a true reflex, because one may occur without the other. For example, even after dilating both eyes with a mydriatic agent, the patient may still be able to converge.
Lens
By showing the light from a pen torch, the clarity of the lens can be assessed. If iris shadow is seen, it is an immature cataract. If no shadow is seen it is a mature cataract. If the colour of lens is yellow, brown or black it is a nuclear cataract. Lens changes should always be correlated with visual acuity. Absence of lens is called Apakia. If the margin of the lens is seen or if there is shaking of the lens one should always suspect subluxation of the lens.
Summary
The OA helps the doctor by recording the initial information about the patient in the case sheet. OA has to examine external parts of the eye systematically and record the findings in the case sheet. OA has to give instructions to patients wherever necessary. Here are some key points to remember:
- Check primary position of eye ball if there is deviation or diplopia
- Sclera, cornea, iris and anterior chamber, pupil and lens can be evaluated by the OA to reduce the doctor's time in the diagnosis
- Abnormalities can be checked and informed to the doctor
- Check ocular motility
- While conducting corneal sensation test, explain the procedure to the patient
- Never dilate eyes with shallow chamber
Student exercise
Fill in the blanks
- ________ are hairs on the margin of the eye lids.
- _______ is seen as a fleshy mound of tissue at the inner canthus.
- Deficiency of tears is best measured by ______ test.
- In elderly people the _______ may appear yellowish because of the presence of fat.
- The cornea is normally free of ________ vessels.
Answer the questions
- What is lagophthalmos?
- What is proptosis?
- Explain ectropion and entropion.
- Write short notes on:
- cornea
- conjunctiva
- iris
- How do you assess pupillary action?
Visual acuity
Definition
Visual acuity is the power of the eye to distinguish objects from one another by their size and shape. It is also a measure of the smallest retinal image which can be appreciated regarding its shape and size. It applies to central vision only. Visual acuity is the medical term for sharpness of vision. It deals with the sharpness, or discrimination, of central vision, rather than the peripheral.
Testing visual acuity
Two distinct points can be visible as separate when the minimum angle subtended by them at the nodal point of the eye is one minute. This is the standard of normal visual acuity. This standard of visual acuity is measured by the minimum angle subtended at the nodal point of the eye. Perfect acuity of vision requires two other basic factors; the light sense and the colour sense. The acuity of vision is tested by standard vision chart known as the Snellen's chart (Fig. 2.1).
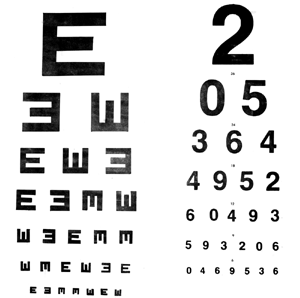
This is a familiar chart that many people have seen in school or community vision - screening programs. The chart consists of Snellen optotypes, specially formed letters of the alphabet arranged in rows of decreasing letter size. The sizes of the letters are standardized so that the letters in each row should be clearly legible at a designated distance to a person with normal vision. Patients sit at a specified distance, generally 6 meters from the chart and are asked to read aloud the smallest line of letters they can discern.
Why is the test performed? Vision testing is an important test in the eye hospital. All the patients should take this test. For small children special tests are available.
How is the test performed?
Overall visual acuity is measured by using the Snellen chart with the large E at the top followed by rows of letters, where each row is smaller than the previous one. A chart using the letter E facing up, down, left, and right is used for children and those who can not read (Fig. 2.2).
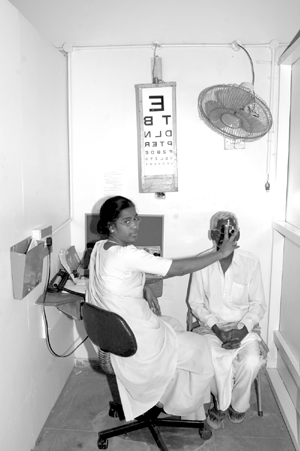
The eye chart is placed 6 meters away from the person being examined. For someone wearing eyeglasses, the first test is performed without glasses. The left eye is covered by the palm of the patient without touching the eye. The patient is to read from the top line to the lowest line possible. Then visual acuity is recorded. The patient is advised to cover the right eye. The vision is recorded for the left eye.
Repeat with distance correction
A reading of 6/6 or 20/20 is normal vision, meaning that the smallest symbol that can be read at a distance of 6 meters is the same as the symbol that a person with normal vision would detect at that distance. A 6/18 or 20/40 reading means that the person can read at a distance of 6 meters what a person with normal vision reads at 18 meters. A person whose vision can not be corrected to 6/60 or 20/200 in the better eye is considered legally blind.
Children
The physical and psychological preparation you can provide for this or any test or procedure depends on the child's age, interests, previous experiences, and level of trust. For specific information regarding how you can prepare the child, following topics are presented.
Vision screening tests for an infant
The following are some of the ways in which an infant's vision can be tested:
- Response to light: An infant will blink in response to a bright light.
- Pupil response: Measuring the response of the pupil (the black centre part of the iris) to a shining penlight on the eye.
- Ability to fix and follow: The most common visual acuity test in infants is a test to check their ability to look at and follow an object or toy.
- Visually evoked response testing: These are tests that stimulate the eyes with either a bright light or special pattern. The infant is connected to a special monitor with attachments on the infant's head. The machine then records electrical activity in the brain as the lights and patterns are shown to infants.
Visual screening tests for a Toddler
Many of the above tests may be performed, in addition to the following:
- Cover / uncover test: This test looks for movement and alignment of the eyes that may occur when a child is focusing on an object. One eye is covered with an opaque card while the child stares straight ahead, at which time the examiner observes the uncovered eye.
Visual screening tests for a preschooler (usually around age 3)
The same tests as used for the toddler, in addition to the following tests are done:
- Visual acuity tests: Specific tests and charts may be used to measure both near and distant vision. For the preschooler, these charts may consist of pictures or stories instead of letters of the alphabet.
- Ishihara colour plate: This test helps to determine colour blindness in a child above the age of 5 years.
Normal values
Visual acuity is expressed as a fraction. The top number refers to distance one stands from the chart. This is usually 6 meters. The bottom number indicates the distance at which a person with normal eyesight could read the same line.
For example, 6/6 or 20/20 is considered normal. 6/18 or 20/40 indicates that the patient correctly read letters at 6 meters which could be read by a person with normal vision at 18 meters.
Abnormal results may indicate that corrective lenses are needed to obtain normal vision. Some of the vision problems are:
- Nearsightedness
- Farsightedness
- Astigmatism
- Presbyopia
Colour vision
The colour of any object is determined by the wave length emitted or reflected from the surface. White light is a mixture of wavelengths of the visible spectrum. Colour is perceived by three populations of cone photoreceptors in the retina which are sensitive to light of short (blue), middle (green) or long (red) wave lengths.
A congenital colour vision defect occurs if a cone pigment is absent or if there is a shift in its spectral sensitivity. Hence, deuteranopia, protanopia and triternopia indicate absence of green, red and blue cone function, and deuteranomaly, protanomaly and tritanomaly indicate a shift in the corresponding cone sensitivity. The X-chromosome carries genes encoding for red and green pigment where as other chromosomes carry the blue pigment gene. 8% of men and 0.5% of women have a defect of the red/green system; the most common is deuteranomaly which occurs in 5% of men and 0.3% of women. Tritan defects are rare.
Congenital colour defects characteristically affect particular parts of the colour spectrum. Acquired colour defects occur throughout the spectrum but may be more pronounced in some regions.
For example, acquired optic nerve disease tends to cause red-green defects. An exception occurs in glaucoma and in autosomal dominant optic neuropathy which initially cause a predominantly blue-yellow deficit; it has recently been found that visual field loss in glaucoma is detected easier if perimetry is performed using a blue light stimulus on a yellow background. Acquired retinal disease tends to cause blue-yellow defects. Clinical tests of colour vision are designed to be performed in illumination equivalent to afternoon daylight in the northern hemisphere.
The following tests are done to detect colour vision defect
- The Farmsworth - Munsell (FM) hue 100 test.
- D - 15 test
- Ishihara Pseudochromatic test plates: Various combinations of colours are used to identify the nature of the colour vision deficit.
The hue test, or Farnsworth-Munsell 0-15 test, provides a more precise determination of colour vision deficits. The test consists of 15 pastel-coloured chips of similar brightness but subtly different hues, which the patient must arrange in a related colour sequence. The sequence is obvious to patients with normal colour vision, but patients with colour deficiencies make characteristic errors in arranging the chips.
Common abbreviations in visual acuity measurement
| V, VA | = visual acuity |
| OD or RE | = oculus dexter, right eye |
| OS or LE | = oculus sinister, left eye |
| CC | = cum correction, with correction (eye glasses or contact lenses ) |
| SC | = sine correctio, without correction (eye glasses or contact lenses) |
| Ph | = pinhole |
| CF | = counts finger |
| HM | = hand motion |
| LP | = light perception |
| LPP | = light perception with projection |
| NLP | = no light perception |
| PG | = present glass |
| BCVA | = best corrected visual acuity |
Instruments required
Occluder: a hand-held paddle used to cover one eye during a test
Pinhole paddle: a hand - held paddle with small viewing holes, used to determine whether spectacle lenses are likely to improve vision
Projector: required if a projected image of the test chart is to be used
Mirror: required to obtain the correct optical distance between the patient and the chart when the physical distance is too short
Snellen's chart: for adults and children who know the alphabet or numbers
Tumbling E chart: for children and those who cannot read
Letter-matching tests: (20 to 10 feet): The children need not know the letter but they only need to match whatever letter you point to
Teller acuity cards: With vertical black and white stripes (gratings) to test the visual acuity of infants and preverbal toddlers (the examiner watches for a shift in gaze through a pinhole in the card)
Summary
In this unit the OA learns about the different types of charts used for vision testing and evaluating vision. The OA understands the advantages and disadvantages of all the charts and selects the appropriate chart according to the age group and type of visual defects. The key points to remember:
- Visual acuity is the medical term for sharpness of vision.
- The standard of visual acuity is measured by the minimum angle subtended at the nodal point of the eye.
- Snellen's chart is used to measure the visual acuity
- The eye chart is placed 6 meters away from the person being examined
- Visual acuity is expressed as a fraction
Student exercise
I. Expand
- OD or RE
- CC
- HM
- CF
- NLP
II. Fill in the blanks
- An infant will ______ in response to a bright light.
- _________ test helps to determine colour blindness in a child.
- Visual acuity is expressed as a ___________.
- _________ is considered as normal visual acuity.
- ________ and _______ tests are conducted to detect colour vision.
III. Answer the following
- Define visual acuity.
- Why is the visual acuity test performed?
- How is the visual acuity of a person tested?
- List the different types of visual acuity tests.
- Write short notes on: Colour vision, pinhole paddle, mirror, teller acuity cards.
Measuring intraocular pressure
Definition of intraocular pressure (IOP)
Intra-ocular pressure refers to the pressure exerted by the contents of the inside of the eye on the eyeball. Its equilibrium is maintained by the aqueous humour formation, its outflow by the episcleral venous pressure.
Normal IOP values
- Ranges between 10.5 and 20.5mm of Hg
- Mean IOP = 15.5mm of Hg
- Higher-than-normal IOP measurements indicate possible glaucoma
Measurement of IOP
- Direct measurement (Manometry)
- A needle is introduced into the anterior chamber and is connected to a suitable mercury manometer
- Disadvantage: Not a practical method for routine IOP measurement
- Tonometry or indirect method
- An indirect method of measuring IOP with instruments called tonometers
- Types of tonometer
- Indentation or impression tonometers (e.g., Schiotz)
- Applanation tonometers (e.g., Goldmann applanation tonometer)
Schiotz tonometer
Schiotz tonometer was first devised in 1905. Schiotz indentation tonometer works on the fundamental fact that the plunger will indent a soft eye more than a hard eye (Fig. 2.3).
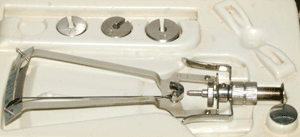
Parts of a Schiotz tonometer
- Handle for holding the instrument in vertical position on the cornea.
- Foot plate which rests on the cornea.
- Plunger which moves freely within a shaft in the foot plate.
- A bent lever whose short arm rests on the upper end of the plunger and a long arm which acts as a pointer needle. The degree of indentation is shown by the movement of this pointer over a scale.
- Scale
- Weight disc of 5.5gm is fixed to the plunger. Extra weights 7.5gm, 10gm and 15gm can be added to the plunger.
Maintenance and sterilisation of a Schiotz tonometer
- Remove the plunger from the tonometer
- Soak the wiper in spirit and clean the plunger, foot plate, three weights, hollow shaft and the model cornea
- Fix the 5.5gms weight and plunger in the tonometer
- Heat the footplate over the blue flame of the spirit lamp for two minutes. Now the footplate is sterilised
- Keep the tonometer over the sterile wipers so that it cools down to room temperature
- Check the instrument by placing it over the model cornea. The indicator should show "0" on the scale. Ensure proper functioning of the instrument before each IOP recording and calibrate. To calibrate the tonometer, place the foot plate on the model cornea provided before examining each case. Scale reading of zero ensures proper calibration. If the pointer is between 1 and 0, the footplate needs to be cleaned again. Check again by placing the tonometer over the model cornea
- Always sterilize with an antiseptic solution the part of the instrument that will come in contact with the patient's eye
- Allow three minutes for the alcohol (sterilising agent) to dry to prevent alcohol keratitis
- After the measurement, remove the weights and unscrew the plunger to clean thoroughly
- Keep the instrument covered within the case when not in use
Practical usage of Schiotz tonometer
- Wash and dry your hands before using the instrument
- Always check the instrument before usage and calibrate
- Patient should lie supine facing the ceiling
- Explain to the patient that drops will be instilled in their eyes. It may cause a burning sensation. After one minute an instrument will touch their eye and it will not be felt
- Administer one drop of lignocaine 4% in the eye to be tested
- Allow 2 to 5 minutes for the local anaesthetic to act
- Rest your fingers only on the bony orbital rim and not over the eye ball
- Gently separate the lids
- Ask the patient to hold their hand up and look at the thumb or a finger to give them a point of fixation
- With the tonometer having no added weights (the instrument weighs 5.5gm) rest the foot plate on the centre of the cornea
- Look at the scale of the tonometer to find out the degree of indentation. If it indicates 3 or less, put the next heavier weight on the plunger and so on. When the scale reading is > 4 it is an ideal indentation
- Use the provided Friedenwalds conversion table for estimation of IOP'S
- Record the readings for each eye separately in the patient's chart
Chart for IOP calculation by Schiotz tonometry (Friedenwalds chart)
| Schiotz scale reading | IOP in mm of Hg with different plunger body weights | |||
| 5.5gm | 7.5gm | 10gm | 15gm | |
| 3.0 | 24.4 | 35.8 | 50.6 | 81.8 |
| 3.5 | 22.4 | 33.0 | 46.9 | 76.2 |
| 4.0 | 20.6 | 30.4 | 43.4 | 71.0 |
| 4.5 | 18.9 | 28.0 | 40.2 | 66.2 |
| 5.0 | 17.3 | 25.8 | 37.2 | 61.8 |
| 5.5 | 15.9 | 23.8 | 34.4 | 57.6 |
| 6.0 | 14.6 | 21.9 | 31.8 | 53.6 |
| 6.5 | 13.4 | 20.1 | 29.4 | 49.9 |
| 7.0 | 12.2 | 18.5 | 27.2 | 46.5 |
| 7.5 | 11.2 | 17.0 | 25.1 | 43.2 |
| 8.0 | 10.2 | 15.6 | 23.1 | 40.2 |
| 8.5 | 9.4 | 14.3 | 21.3 | 38.1 |
| 9.0 | 8.5 | 13.1 | 19.6 | 34.6 |
| 9.5 | 7.8 | 12.0 | 18.0 | 32.0 |
| 10.0 | 7.1 | 10.9 | 16.5 | 29.6 |
Attitude
- Communicate well with the patient to reduce anxiety.
- Clear the patient's doubts by answering all questions.
- Assist the patient to maintain a comfortable position throughout the procedure.
- Handle the equipment with care.
- Communicate the results to the ophthalmologist.
Advantages of Schiotz tonometry
- Simple to use
- Low price
- Easy usage
- Portability
Disadvantages of Schiotz tonometry
- Patient has to lie supine
- Operator variability
- Cannot be done in patients with corneal pathology, infections, or changes in ocular rigidity.
- Errors in recording IOP
Sources of errors in recording IOP by Schiotz tonometry
- Error due to contraction of extraocular muscles.
- Error due to accommodation
- Error due to ocular rigidity
- Error due to variations in corneal curvature and thickness
- Error in scale reading and faulty technique
- Error due to usage of pressure on the globe
Non-contact tonometry
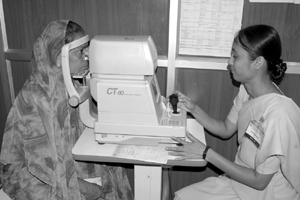
A Non-contact tonometer measures the IOP without touching the cornea. The patient is made to sit in front of the instrument, asked to keep their chin on the chin rest and fix their gaze at a red dot inside the machine. The OA adjusts the machine and triggers a puff of air onto the cornea which deforms the corneal apex. The time taken for deformation is converted to IOP (Fig. 2.5).
A Non-contact tonometer can be used in patients with:
- Corneal abrasions
- Reaction to local anaesthetic
- Ocular surface infection
- And in mass screening
- Paediatric age group
- Uncooperative patients
Summary
In this section the OA has becomes familiar with the Schiotz tonometer and the Non-contact tonometer and has learned to use both types to measure the patient's intraocular pressure. OA knows how to give clear instructions to the patient about the procedure, and how only after clarifying all their doubts the OA can proceed with the test. Additionally, OA knows how to properly handle, maintain, and sterilize the equipment.
Key points to remember
Do's in measuring IOP by Schiotz tonometer
- Explain the procedure and its importance to the patient in their own language in a gentle way.
- Always wash and dry your hands before working.
- Be gentle while separating the eyelids
- Take two to three readings when you find the values are abnormally low or high.
- Special care is required in eyes which are swollen after surgery or injury. In - patients who are unable to open their eyes voluntarily or when the patient is not co-operative, reassure the patient and resume work gently.
Don'ts in measuring IOP by Schiotz tonometry
- Do not rest your fingers over or on the globe.
- Do not do indentation tonometry in a red and inflamed eye / eyes with conjunctivitis, corneal pathology, and foreign body, in dry eye or in trauma.
Student exercise
Fill in the blanks
- Normal IOP value is __________.
- Tonometry is ---------------------measurement.
- If the pointer is between 1 and 0 __________ is to be cleaned again.
- Heat the footplate over the blue flame of the spirit lamp for _____________.
- Look at the scale of the tonometer to find out the degree of---------------. If it indicates --------, put the next heavier weight.
Answer the questions
- What are the types of tonometers?
- List the parts of a Schiotz tonometer.
- Describe the methods of maintenance and sterilisation of Schiotz tonometer.
- What are the advantages and disadvantages of using Schiotz tonometer.
- Write a short note on non-contact tonometer.
Evaluation of the patency of lacrimal drainage apparatus
The Lacrimal apparatus constitutes those structures which are concerned with the formation, transport and drainage of tears. They are broadly divided into:
- Lacrimal gland
- Lacrimal passages
Lacrimal gland
This is situated along the antero-lateral position of the roof of the orbit. Lacrimal glands secrete tears and the tears drain into the conjunctival sac through lacrimal ducts.
Lacrimal passages
The lacrimal passage includes the following:
- Puncta: There are two lacrimal puncta one in each eyelid. They are situated near the medial canthus. The upper punctum is 6 mm from the medial canthus whereas the lower punctum is about 6.5 mm from the medial canthus.
- Canaliculi: There are two canaliculi in each eye, one in the upper eyelid and the other in the lower. The canaliculi continue from the punctum and transport the tears into the lacrimal sac.
There are 2 divisions of canaliculi
- Short vertical limb of about 2 mm which is proximal followed by
- Long horizontal limb, which continues from the vertical limb and ends in the common canaliculus which drains into the lacrimal sac. Horizontal limb is 8 mm in size.
- Lacrimal sac: This is an expanded structure situated in the lacrimal fossa measuring about 11-12 mm in length and 4-5mm in width. The lower end of lacrimal sac continues as nasolacrimal duct.
- Nasolacrimal duct: This is a long slender tube of about 18mm in length directed backwards, outwards and downwards. The nasolacrimal duct opens into the inferior meatus of the nose.
The tear fluid is secreted from the lacrimal gland and drains through the lacrimal ducts into the conjunctival sac. As a result of constant blinking, tear fluid is uniformly distributed and the cornea and conjunctiva are well lubricated. The tear fluid goes into the lacrimal sac through the lacrimal puncta and canaliculi. From the lacrimal sac, tears drain into the nose through the nasolacrimal duct.
Tests to evaluate the patency of the lacrimal passage
- Regurgitation test: Put pressure over the lacrimal sac area and look for regurgitation through the punctum.
- Fluorescein dye disappearance test: Instill one drop of fluorescein solution in the conjunctival sac and after 5 minutes look for the presence or absence of the dye in the conjunctival sac. Absence of dye indicates drainage.
- Jones test: Instil one or two drop of fluorescein dye in the conjunctival sac. Place a piece of cotton dipped in 2% Lignocaine in the nasal cavity. After 5 minutes look for the stain on the cotton which indicates patency.
- Dacryosystography: Inject a radiopaque material into the lacrimal sac, take sequential X-rays, and evaluate patency.
- Lacrimal scintillography: Injection of radioactive material into the lacrimal sac and visualisation with a Gamma camera.
- Chloramphenicol tasting test:
Instil two drops of chloramphenicol drops in the eye using pouch technique. The patient keeps the eyes closed for two minutes. Within five minutes the patient will appreciate the bitter taste of chloramphenicol when the NLP is patent.
Lacrimal syringing technique
This test involves the irrigation of the lacrimal passage with saline. The presence of saline in the nasopharynx indicates a patent Nasolacrimal Passage (NLP).
Instruments required for lacrimal syringing
- 2% Xylocaine eye drops
- Nettleship punctum dilator
- 2ml syringe with either
- Disposable 26 gauge canula
- Blunted and bent 26 gauge needle
- Normal physiological saline solution.
- A separate needle (or cannula) for each eye to prevent cross infection.
Indications: (When to use this technique)
- In persons with watering and discharge and clinically suspicious of obstruction of the lacrimal passage
- Before any intraocular surgeries and procedures.
- Following DCR / DCT to ensure the efficacy of the surgery.
Contraindications
- Acute exacerbation of chronic dacryocystitis
- Acute dacryocystitis
- Other painful conditions
Lacrimal syringing procedure
- The procedure and its importance in diagnosis is explained to the patient and they are reassured.
- Patient is asked to lie supine on an examination table (Fig. 2.5).
- Instil 2% lignocaine drops at the punctal region and into the conjunctival sac.
- Instruct the patient to indicate when flow of saline is felt in the throat.
- Ask the patient to look upwards, pull the lower lid down and laterally to straighten the lower canaliculus and evert the punctum away from the ocular surface.
- Take the syringe in the pen-holding position.
- Hold the lid in this position throughout and gently insert the cannula first vertically and then horizontally.
- Advance slowly into the middle of the canaliculus and irrigate.
- If difficulty is experienced in introducing the cannula/needle then the punctum may be dilated with a punctum dilator.
- Do not apply pressure while introducing the cannula/needle as it may result in injuries and create false passages.
- Inject saline with moderate pressure.
- If locating the lower punctum or introducing the cannula is difficult; syringing may be done through the upper punctum.
- Ask the patient to look down and hold the upper lid with thumb and ring finger. Stretch it down slightly and evert. Then see the upper punctum and pass in the cannula/needle.
- Ask whether the patient felt the flow of saline in the throat.
- In persons who can't feel the flow of saline through the throat 2-3 drops of chloramphenicol eye drops may be mixed and then asked whether they feel a sensation of bitterness in the throat.
- Interpret your results.
- Apply a drop of antibiotic eye solution to the conjunctival sac.
- Clean the areas surrounding the eye with a sterile cotton wiper.
Interpretation of results
- Patent lacrimal passage: Free flow of saline through the lacrimal passages into the nose and throat.
- Partial obstruction: Flow of saline through the passages into the nose with considerable force of syringing. Part of the fluid goes into the nose and throat. Rest of the fluid regurgitates through the opposite punctum.
- Obstruction of one canaliculus: No flow of saline into the nose. Instead regurgitation through the same punctum. Subsequently syringing through the other puntum should show free flow of fluid.
- Obstruction of both canaliculi: No flow of saline into the nose and regurgitation of saline through the same punctum in both upper and lower canalicular syringing.
- Obstruction of the lacrimal sac or nasolacrimal duct or common canaliculus: Here no flow of saline into the nose, instead regurgitation of saline through the other punctum.
Advantages of syringing
- Simple test to be performed
- Less time consuming
- Cost effective test
- Can detect
- Presence or absence of obstruction
- Site of obstruction
- Partial or complete obstruction
Disadvantages of syringing
- Requires skill
- Chances of injuring tissues and creating false passages
- Not be performed in acute cases
- Chances of inducing infections if not properly done.
Here are some of the findings that can be observed while syringing
- Free of obstruction
- Partially free with clear fluid through the upper punctum
- Not free with clear fluid through the upper punctum
- Not free with pus through the upper punctum
- Not free with mucus through the upper punctum
- Not free with pus mixed with clear fluid through the upper punctum
- Not free with mucus mixed with clear fluid through upper punctum regurgitation of pus on pressure over lacrimal sac area (ROPLAS)
- Regurgitation mucus on pressure over lacrimal sac area
- Not free with clear fluid through the fistula
- Not free with clear fluid through the same punctum (UP)
- Not free with clear fluid through the same punctum (LP)
- Both canaluli blocked
- Both punctum blocked or either one of the punctum is blocked
- Lower punctum not seen and upper punctum seen.
- Upper punctum not seen but lower punctum seen
- Both puncta not seen
- On pressure over the sac swelling no regurgitation through the puncta , but fluid goes in to throat or fluid dripples through the nostril- it is called Atonic sac. After completely pressing this swelling the patient is made to lie down and lacrimal syringing is done slowly. Small swelling develops and gradually increases in size in the sac area. There is no regurgitation through the punctum and no fluid flow in the throat or nose.
Summary
This section teaches the OA about the lacrimal syringing. OA applies their knowledge in the anatomy of the eye lesson in this procedure. The lacrimal syringing technique is taught with the principle and how to interpret the results.
Key points to remember
- Make the patient lie comfortably on the side of the eye to be syringed.
- As this is an invasive procedure, be gentle enough to manipulate the tissues.
- As this procedure involves participation of the patient, counsel and instruct the patient to inform you following the sensation of flow of saline in the throat.
- Do not give strong pressure on the cannula as it may injure tissues and may create false passages.
- Do not repeat the procedure unnecessarily.
- Exert more care in patients with swelling and in uncooperative persons who have the fear of being syringed.
- Be observant in finding from where the fluid regurges if any and the amount of force required to irrigate.
- Do not syringe in persons with painful swelling in the sac region i.e. acute dacryocystitis, lacrimal abscess etc..
- Gentleness plays a key role in the successful lacrimal syringing
Student exercise
Answer the following
- What are the ways to evaluate the patency of lacrimal passages?
- How to perform lacrimal syringing?
- How to interpret the results of syringing?
- Write short notes on:
- Canaliculi
- Nasolacrimal duct
- Equipment required for lacrimal syringing