
Assisiting in Out Patient Procedures
The slit lamp biomicroscope is an instrument that allows detailed examination of the eye by providing a magnified image.
Uses of a slit lamp
A slit lamp is used to illuminate and examine under magnification the anterior segment of the eye. It enables the observer to view binocularly the conjunctiva, sclera, cornea, iris, anterior chamber, lens, and the anterior portion of the vitreous, and it helps to detect disease occurring in these areas.
- With the help of gonio lens, angle structures can be visualised. The 90D lens helps in visualising the retina and CDR (cup disc ratio).
- The blue light is used to see epithelial defect and abrasion in the cornea when it is stained by Fluroscein.
- The green light is used to visualise the optic disc and nerve fibre layer.
- Depth of anterior chamber can be calculated
- Diameter of the cornea can be assessed, both in the horizontal and vertical.
- Various slits, with different positions of the light source are used to visualise corneal pathology (eg: corneal guttae) etc. The slit lamp microscope is of special importance in conditions such as anterior uveitis and conjunctivitis, dendritic keratitis, foreign body, and early lens changes that are better diagnosed and treated by having a well illuminated and highly magnified view of the area.
- The attachment of an applanation tonometer permits measurement of the intraocular pressure.
- Camera attachments enable photography of the anterior segment of the eye.
The slit lamp consists of 4 important parts
- Viewing arm - The examiner looks through a pair of eye pieces called oculars. The knurled focusing ring around each ocular can be twisted to suit the examiner's refractive error and inter-pupillary distance. The oculars are attached to a housing containing the instrument's magnification elements. Below this housing is a lever for adjusting magnification.
- Illuminating arm - The illuminating arm can swing 180 degrees side to side on its base allowing the examiner to direct the light beam anywhere between the nasal and the temporal aspects of the eye.On the top of the illuminating arm is lamp housing containing light bulb. At the base of the housing, a window exposes a disk showing a calibrated scale that indicates the length of the beam being used. In a separate housing below the scale, is a lever for varying the brightness of the light beam. At the base of the housing is a projecting knurled knob. When this knob is twisted the length of the light beam varies. Accessible by either hands, knurled dual knobs for changing the width of the light beam are located.
- Patient positioning frame - This consists of two upright metal rods to which a forehead strap is attached. The patient's chin is placed in the chin rest. Below the chin rest is a knob to adjust its height. A fixation light may be attached to a moveable arm, projecting from a cross piece above the two rods that form the patient positioning frame (Used for patients to fix the eyes).
- Base - The slit lamp's joystick control is located on the base and can be moved forward, backward, laterally or diagonally. The joystick can be twisted and rotated to lower or to elevate the light beam.
There is a knob which when tightened prevents movement of the joystick and slit lamp. Under the joystick is the supporting platform.
Various additional devices can be attached to the slit lamp. An applanation tonometer, for example, can be used to record IOP; and a focusing test rod can be used to adjust the slit lamp's focus very accurately.Assisting in Slit lamp Examination
Check the instrument and keep the necessary equipment ready for use. For example, if a suture or foreign body has to be removed keep a sterile tray with necessary articles (Fig. 4.1).
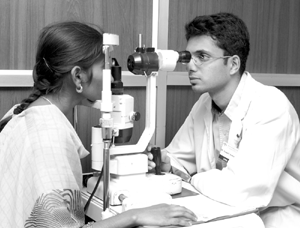
Identify the correct patient for slit lamp examination. Explain the exact procedure to the patient and the reason for doing it. This will reduce the anxiety of the patient. Tell the patient that to get a magnified image of the eye, the eye is examined with the help of the slit lamp.
Explain to patients that they have to place their chin on the chin rest and their forehead against the headrest without discomfort, and to position the eyes corresponding to the level marked in the chin support panel. Help the patient in the process. Request the patient to co-operate with the doctor, so that the test will be over quickly. Clear the doubts of the patient by answering all his questions.
Communicate necessary information about the patient to the doctor. Assist the patient in maintaining a comfortable position throughout the procedure.
The doctor will adjust the chin rest and microscope so the beam of light falls on the cornea or other area to be examined. If the doctor examines the right eye, the patient is to be asked to fix his left eye.
The doctor then adjusts the narrow beam to be directed from the side of the cornea.
Maintenance of the slit lamp
- Keep the instrument covered when it is not in use to keep dust and debris at a minimum
- The instrument can be cleaned with a soft clean cloth. The slit lamp has a locking device that should be engaged when the examination is completed. If the slit lamp table is suddenly jerked and the slit lamp is not locked, it could be damaged
- The slit lamp should not be used as a writing table,because the ink of the ball pen causes a lot of ugly lines over the instrument
- The chin rest and hand rest should be wiped with an alcohol wipe between patients.
- Never touch the mirror of a slit lamp because fingerprints will prevent full illumination and damage the mercury coating.
- The slit lamp is to be thoroughly examined and cleaned properly by the instrument maintenance department or the OA.
- Handle the equipment with care, as it is costly.
Moving the slit lamp
- All mobile parts like light house, eye piece and handle should be locked
- Release the wheel brake so the slit lamp can be moved
Assisting in Gonioscopy
Gonioscopy is the procedure in which the angle of the anterior chamber is examined. Four structures, namely, Schwalb's line, the trabecular mesh work, the scleral spur and the ciliary body band are examined.
Indications for Gonioscopy
- In glaucoma patients for differentiation of the types of glaucoma (angle-closure or open angle)
- To visualise and remove a foreign body at an angle
- To study tumours of the iris and abnormalities of its angle
- To view the posterior of the iris, the ciliary body and the ciliary processes
Types of Gonio lenses
- Koeppe's lens: refracts light at an angle.
- Goldmann's lens: reflects light at an angle.
Prior to gonioscopy, refraction and undilated fundus evaluation and intra-ocular pressure recording have to be done, as the lubricant solution used in gonioscopy may alter those findings.
Procedure for assisting in a Gonioscopy evaluation
- Wash and dry hands.
- Explain to the patients the nature and need of this examination and gain their confidence.
- Inform the patient that the doctor will examine the internal structure of the eye with a special lens. Assure the patient that there will be no pain during the process, and patiently answer all of their questions to clear any remaining doubts.
- Apply one or two drops of 4% lignocaine ophthalmic solution into the eyes of the person to be examined.
- Give cotton to the patient, so that if the eye drops dribble outside of their eye they can wipe it.
- Seat the patient comfortably in front of the slit lamp and position the head in the frame opposite the examiner.
- Have the gonio lens ready. A clean and sterile lens should be filled with methyl-cellulose solution in order to avoid air bubbles which may intervene and obscure gonioscopic vision.
- Gently hold the patient's head along with the patient positioning frame and ask the patient to look up so as to facilitate easy application of the gonio lens and examination by the doctor. If the patient is apprehensive, the OA may have to help the patient keep the patient's eyelids open. When you help them to keep the lids open, do not use pressure but handle softly. Throughout the test, make sure that the patient is sitting comfortably.
- After the test is over, wipe their eye and the surrounding areas with clean cotton and help the patient get up if necessary.
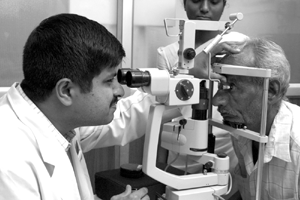
- After completion of test, clean and sterilise the gonio lens and keep it ready for the next patient. Handle the gonio lens with care, as it is easily scratched or broken, and it is very costly(Fig. 4.2).

Cleaning of the Gonio lens
Using a rotary motion, carefully wash the lens in lukewarm water with a moisture cotton ball that contains a few drops of dishwashing liquid
- Rinse with lukewarm water.
- Blot the lens dry using a lint free lens cleaning paper or absorbent cloth.
- Store the lens in a dry state in its chamber
Disinfecting Gonio lens
- Soak for 10 minutes in 2% glutaraldehyde solution
- Soak for 5 minutes in fresh 1:10 dilution of household bleach
- Remove from solution and rinse with water. 10 minutes of continuous rinse in tap water can sterilize the lens.
- Blot the lens dry using a lint free lens cleaning paper or absorbent cloth.
- Store the lens dry inside its case
Assisting in Applanation Tonometry
Definition of Intra Ocular Pressure (IOP)
Intra ocular pressure refers to the pressure exerted by the Intra ocular contents of the coats of the eye ball. It is maintained by the equilibrium between the aqueous humour formations, it's out flow and the episcleral venous pressure.
Normal IOP values:
Ranges between 10.5 and 20.5mm of Hg
Mean IOP = 15.5+ 2.5 mm of Hg.
Increase in IOP more than normal values indicates glaucoma.
Goldmann applanation tonometer
Basic aspects
- Reliable and accurate measurement of IOP is possible with Goldmann applanation tonometer.
- Universally accepted as a gold - standard method.
- Easy to perform after practicing.
- Requires a slit lamp to measure IOP.
Requirments
- 4% Xylocaine drops
- Fluorescein impregnated paper strips
- Cotton wiper
- Slit lamp
How it works
- The applanation tonometer is to be mounted on a slit lamp and the patient is positioned at the slit lamp
- It works by pressing against 3.06mm of the cornea and measures the size of the semicircle needed to flatten that area of the cornea
- It consists of a plastic prism with a flat anterior surface and a diameter of about 7mm
Procedure
- Explain the procedure and win the confidence of patient.
- 4% Xylocaine eye drops to be applied to both eyes. Before applying the drops the patient is to be informed that the drops may cause irritation for a minute, and then apply. Give clean cotton to the patient to wipe if the drops dribble outside the eye.
- Stain both the eyes with fluorescein. While staining the eye, care must be taken that the drops do not stain the patient's dress.
- Seat the patient comfortably at the slit lamp.
- Instruct the patient to look straight ahead and to open the eyes maximally and if needed the OA can help the patient to open the eyes maximally.
- Set the slit lamp illumination with cobalt blue filter.
- Once the patient is ready, move the tonometer forward with the joy stick of the slit lamp until it gently touches the centre of the cornea.
- Two bright yellow-green semicircular areas should be seen through the eyepieces of the slit lamp. They should be in a sharp focus and of equal circumference one above and one below, and center.
- Any needed correction is made by the joy stick of the slit lamp.
- Adjust the measuring drum such that the two semicircular arcs move until they just overlap. The inner edges of the semicircles should coincide. This is the point at which reading should be taken.
- Reading that is obtained is to be multiplied by ten to convert into equivalent value in mm of intraocular pressure.
- Record the reading of each eye separately in the patient chart (Fig. 4.3).
Care and maintenance
- Clean the instrument after each use with a clean cloth or sterile cotton swab.
- Soak the applanation tip in diluted H2O2 Hydrogen Peroxide (1:10 household bleach) for 5-10 minutes and it should be rinsed thoroughly with warm water and dried well before use.
- Soak in 70%iso propyl alchohol, prism should be rinsed and dried to prevent ephithelical defect. Wipe with alcohol, H2O2 iodophore (povidone iodine) 1:1000 merthiolate or dry tissue is also adequate. Alcohol should be allowed to evaporate and dry before use. Alcohol and 70% isopropyl alcohol can cause mild damage to tonometer tip; it needs to be handled carefully with especially after contact with high risk patients with infections like adenovirus, hepatitis, herpes and AIDS.
- Remove dirt from the Goldmann applanation prism that cannot be cleaned with the liquid by blowing it with the dry empty bulb syringe.
- Remove finger prints or oil from the applanation tip.
- Be sure that the cleaning agents are completely removed from the lens surface.
- Check the applanation surface, whether any breaks are present that could damage the cornea during the process.
Key points to remember
- Encourage the patient to look straight and keep eyes maximally open.
- Help the patients to position them at the slit lamp. The tip of the applanating prism should not be touched at any time.
- The applanation tip has to be cleansed and replaced in its case when not in use.
- If the eyelids contact the applanation tonometer, half circles will spread out. Wipe off the tip and try again.
Assisting in Fluorescein Staining
Required materials
(To define the crater of corneal ulcers flourescein and rose bengal dyes/stains can be used. Here we will confine ourselves to fluorescein.)
- Fluorescein-tipped paper strips or flourescein solution
- Sterile wiper jar
- Xylocaine 4%
- Hypromellose
- Sterile forceps
- Hand towel
- Soap with soap tray
Procedure
- Explain the fluorescein procedure to the patient. The eye will be stained with special dye to enable the doctor to diagnose accurately and decide the type of treatment to be given.
- Wash hands before and after the procedure and do not touch the tip of the fluorescein strip.
- The OA should apply sterile impregnated fluorescein strip/liquid dye to the eye by everting the lower eye lid (if required, local anaesthetic drops of 4% Xylocaine can be added).
- Advise the patient to close and open their eyelid. The fluorescein will stick to the epithelial breaks (ulcers) in the cornea giving a yellowish-green colour. This is best seen with the blue light.
- Clean the excess fluorescein in and around the eye with cotton.
- The patient is then taken to the ophthalmologist for examination.
Other uses of fluorescein
- In applanation tonometry
- To check the rigidity of a contact lens fitting
- To check the patency of the duct in children
- To check for aqueous leakage from anterior chamber in penetrating corneal wounds
- Dyes administered by injection may be used to evaluate retinal conditions (FFA)
Assisting in Corneo-Scleral Suture Removal (CSSR)
Required materials
- Sterile 26-gauge needle
- Sterile wiper jar
- Iodine
- Xylocaine 4%
- Kidney tray
- Antibiotic drops and ointment
- Sterile foreceps
- Hand towel
- Liquid soap
- 10-0 Nylon sutures are used for closure of wound in ECCE surgery with IOL implantation (either interrupted or continuous). Routinely these sutures are not removed, unless they cause irritation, or with the rule astigmatism is more than 2.5D
Time and indications
Suture removal is done only after 3 months following surgery so that adequate healing of wound has taken place. In some cases where there are loose sutures with adequate healing of section, suture removal can be done after one month. They are removed when there are:
- Loose sutures
- Exposed knots
- Irritation due to protruding ends
- High with the rule astigmatism >2.5D
Sutures can be trimmed or removed. Suture relaxation alone should not be done because the ends of the suture will protrude later and cause irritation. If sutures are deep, CSSR can be done at operating room.
Procedure
- All suture removal is done under slit lamp.
- Antibiotic drops are to be instilled at least 4-5 times at 15 minutes intervals prior to CSSR.
- Clean the slit lamp
- Gather the materials needed
- Wash hands thoroughly and dry
- Clean the patient's eyes
- Topical 5% povidone iodine beta dine eye drops are to be instilled in the patient's eye
- OA should have knowledge of making the patient comfortable under the slit lamp
- 4% Xylocaine drops are to be used as local anaesthesia
- Doctor should wash hands twice
- Assist the doctor in this procedure
- Suture-cutting is done using 26G disposable needle or with a sterile blade
- Cut sutures are pulled and removed with sterile forceps
- Antibiotic drops are instilled after CSSR
- Pad and bandage is applied (Not for one-eyed patient) with antibiotic ointment
- In cases where suture removal is done for reducing astigmatism, repeat refraction after 30 minutes and give a spectacle prescription during the next visit.
- All CSSR patients are advised to use antibiotic drops 4 times a day for 1 week and to report back immediately if they develop pain and decreased vision.
- Clean the slit lamp and replace the materials for the next case.
- Bio-waste needles should be discarded.
- Instruct the patient to carry out doctor's advice.
Possible complications
- Gaping wound
- Infection (This is the worst complication. Once endophthalmitis develops, vision is completely lost).
- Corneal abrasion
- Bleeding
Eversion of Eyelids
Eyelid eversion is useful because it helps in thoroughly evaluating lesions and detecting the presence of foreign body. It also makes sure the eye is thoroughly irrigated. (Fig. 4.3a & Fig.4.3b, Fig.4.3c)
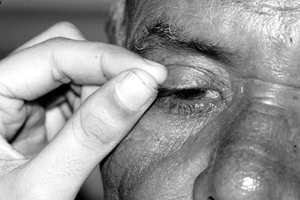
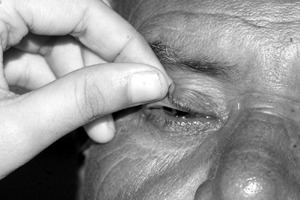
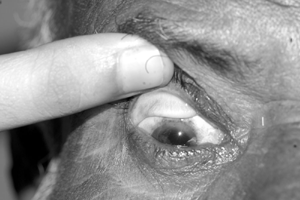
- Eversion of the lower eyelid: The lower lid is drawn down and the patient is asked to look up. Do not apply drops and ointment after everting the lower eyelid
- Eversion of the upper eyelid
Ask the patient to look down. Hold the upper eyelid lashes with thumb and index finger and pull it away from the eye. With the help of the small finger of the other hand or a glass plate, the upper margin of tarsal plate is depressed and the lid is turned up. It requires sufficient practice. When releasing the eye lid, release in a gentle fashion. Most of the time eversion of the eyelid can be done using one hand alone.
Assisting in Foreign Body Removal
History taking
A corneal foreign body may consist of dust, iron filings, vegetable matter, or sand and mud particles. Here are some questions to ask the patient with a foreign body in their eye.
- What was the mechanism of injury?
- Was the patient wearing safety glasses?
- Did the foreign body arise from metal striking metal, which may suggest an intra-ocular foreign body?
Document the visual acuity before any procedure so that it can be compared with vision taken after the treatment. Multiple or loose foreign bodies can often be removed with saline irrigation. The foreign bodies can be removed with cotton-tipped applicator or with fine forceps.
Required materials
- 26 gauge sterile needle
- Sterile wiper jar
- Sterile foreceps
- Xylocaine 4% eye drops
- Antibiotic ointment
- Hand towel
- Soap with soap tray
Procedure
- Test the visual acuity of the patient and record it in the case sheet.
- Help the patient get into position for slit lamp examination by the doctor.
- Apply anesthetic drops 4% xylocaine and reassure the patient.
- Encourage the patient to look straight ahead and to cooperate.
- Help the doctor by holding the head of the patient gently against the forehead rest of the slit lamp.
- Once the foreign body is removed either with a needle or cotton swab, apply a drop of antibiotic eye drops.
- Apply antibiotic ointment. If cycloplegics are applied, inform the patient that they may have blurred vision for a day or two, depending on the drug used.
- Apply a sterile pad and bandage to the eye. Give proper instruction for follow up or other necessary things as instructed by the doctor.
- Be gentle in all the proceedings because a patient with a corneal foreign body will have intense pain.
Schirmer Test
Schrimer test is a measure of tear secretion measured with an absorbing paper strip.
Required materials
- Schirmer filter paper strip
- Sterile wiper jar
- Sterile forceps
- Hand towel
- Soap with soap tray
Procedure
- Seat the patient in a dimly lit room with the back of the head stabilised against the headrest of the examining chair, and then explains the procedure.
- Remove any excess moisture from the patient's eyelid margin with a facial tissue or cotton-tipped applicator. Do not instil any eye drops before the test.
- Fold a packaged, sterile Schirmer paper strip at the indentation mark. To avoid contaminating the sterile strips, bend the round wick end of the test strips at the notch before opening the pouch.
- Open the pouch and remove a strip. Use the strip with the angled end for the right eye. Grasp the strip by the non-wick end to avoid contaminating the wick end with your fingertips.
- Ask the patient to look up, draw the lower lid gently downward, checking to make sure that the lid margin has been adequately dried with a cotton-tipped applicator. By convention, the strip with one corner cut off is used for the right eye.
- Place the rounded, bent end of the test strip over the lower eyelid margin of each eye and release the lower lid to hold the strip in place. The strip is typically placed at the junction of the inner two thirds and the outer one third of the eyelid margin. It should not touch the cornea. The notch should point toward the lateral canthus. Check to make sure that the short end of the strip is inserted all the way to the notch.
- Ask the patient to look slightly above the midline with the eyelids open in subdued light. The patient may continue normal blinking. Patients are permitted to keep their eyes closed during the test, but squeezing should be discouraged.
- Note the time. After 5 minutes have elapsed, remove both strips.
- Measure the distance between the indentation mark and the farthest extent of wetting. Standardised strips are packaged in an envelope with a millimeter sc ale. Do not include the bent wick end in the final measurement.
- Record the result in the chart as follows: Schirmer testing (without anesthetic): right eye: X mm/5 minutes. If complete wetting occurs before 5 minutes, this time should be noted.
Irrigation of the Eye
Irrigation of the eye is done to remove dust or any other foreign particles from the patient's eye. Sterilised water will be applied into the eye with a syringe continuously for 10 to 15 minutes to bring out the foreign material.
Required materials
- Sterile ringer lactate solution
- Sterile wiper jar
- Kidney tray
- Sterile rubber cork with two glass tubes
- Antibiotic drops and ointment
- Cap, Sterile forceps
- Hand towel
- Soap with soap tray
Indications for irrigation
- Chemical injuries (acid and alkali injuries)
- Foreign bodies in eye (especially when lodged under the upper lid)
- Periodic irrigation during ocular surgeries
Procedure
- Explain the procedure to the patient and ask them to lie down. Tell them that the eye will be washed with sterile water with a syringe, to flush out any dust particles or foreign material. Ensure the patient that the process will not be painful and syringe will not touch the eye (Fig. 4.4).
- Put a towel around the patient's shoulder so that the patient's dress will not be drenched. Keep a small cotton ball in the ear so that water will not enter the ear.
- Wash and dry your hands.
- Apply local anesthetic drops (4% Xylocaine).
- Help the patient lie down and ask them to turn to the side of the eye to be irrigated. A patient has come with foreign body in the left eye. Ask the patient to lie down turning to the left side so that the kidney tray could be held against the face and irrigation could be done easily.
- The kidney tray is to be held firmly, against the face and it should not be painful.
- Instead of irrigating the eye first, practice on the cheek first, so that the patient will have an idea about the process. Before separating the eyes, inform the patient that you will be separating the eyelids to irrigate the eye. Without informing them, if you separate the eyelids they may be shocked. After separating the eyelids, tell them that saline will be poured onto the eyes.
- Saline should be poured continuously and uniformly. Ask the patient to look up and down and sideways to expose the conjunctiva fully. It is not enough to have the patient follow your finger. Give instructions verbally. Wash all parts of the conjunctival sac. Straighten the upper eyelid. Use the entire amount of liquid given to irrigate.
- After irrigating the eye, dry the eyelashes softly with sterilized swab
- Remove the tray and see that the patient is comfortable.
- Record the procedure and remove the instruments.
Instead of a bottle, irrigation by syringing can also be done. Make sure to irrigate for at least15 minutes for chemical injuries. Always be gentle to avoid causing injury to the eye.
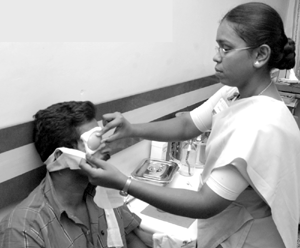
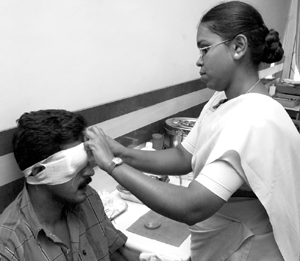
Eyepatches and Bandages
Applying a patch to the eye
- Set out two eye pads and close the patient's eyes either by instruction or manually.
- Fold the first pad in half. Place it over the eye with one hand and hold it in place.
- With your free hand, apply the second pad over the first. (Fig. 4.5 & Fig. 4.5a, b).
- Place the plastic shield over the two cotton pads. Apply a single piece of tape at an oblique angle just above the brow of the opposite eye. Firmly press the tape against the skin medial to lateral so that 6 to 7 centimeters of tape contact the skin above the cheekbone and forehead.
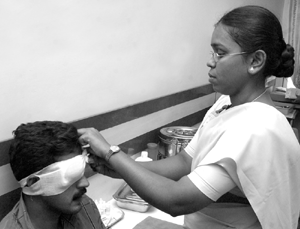
- A long piece of bandage cloth measuring 1mx 10cm. can be tied over it as shown in the figure.
- It should be tied just tight enough to secure the pad properly.
- The knot should come on the forehead and it should be neatly trimmed. (A knot on the side interferes with the sleeping posture of the patient)
Summary
In this unit the out-patient procedures and the role of the OA are explained. The patient will be tested by the ophthamologist in the above mentioned procedures and the OA should have the knowledge of the procedures to assist the doctor and patient effectively. The OA is to collect and check the required materials and keep everything ready so that the doctor can proceed without delay. The OA must be well versed in maintaining the equipment and instruments.
Key points to remember
- Always remember to clean the slit lamp in between patients.
- Handle the instrument carefully to avoid any damage.
- The instruments should always be kept in working condition.
- Always store the Gonio lens in a dry state in its case.
- The tip of the applanating prism should not be touched at any time.
- Document the visual acuity before any procedure so that it can be compared with the vision taken after the treatment.
- Wash and dry your hands before any procedure.
- When you touch the eyelid do not press it hard.
- Xylocaine 4% should be changed daily to avoid infection.
- Strict aseptic technique should be followed throughout the procedures.
- After CSSR no head bath should be taken for one week.
- Advise the patient to come immediately to the hospital if pain develops in the eye.
Student exercise
I. Answer the following
- How does one prepare the patient for slit lamp examination?
- List the uses of slit lamp.
- What is gonioscopy and its importance?
- What are the types of gonio lenses and the most commonly used one?
- What are some practical ways in positioning the patient for gonioscopy and assisting the doctor?
- What are the ways to keep gonio lens clean and disinfected?
- Write the definition of intra-ocular pressure.
- How does one maintain an applanation tonometer?
- What are the uses of fluorescein?
- List the required materials for the suture removal.
- Mention the uses of eversion of eye lids.
- Briefly explain the irrigation of the eye procedure.
II. Write true or false
- A slit lamp is used to check the anterior segment of the eye.
- A slit lamp can be cleaned by spirit / hand rubs.
- Fluorescein stain is used before gonioscopy.
- Schirmer test is done for dry eye.