Vital Signs
A person's health status is measured by his/her vital signs which consist of four elements.
Body temperature indicates the status of body metabolism regulated by higher centers in brain.
Pulse indicates the condition of heart and blood vessels in periphery.
Respiratory sounds and rates indicate the condition of respiratory system.
Blood Pressure indicates the status of circulatory system.
Vital signs
Definition
Vital signs are physical findings that indicate an individual is alive, such as heart beat, breathing rate, temperature and blood pressure. These signs can be observed, measured, and monitored to assess an individual's level of physical functioning. Normal vital signs change with age, sex, weight exercise, and tolerance condition.
Normal ranges for the average healthy adult:
- Temperature - 98.6° F
- Respiration - 16-18 per minute
- Pulse - 60-90 per minute
- Blood pressure - 120/80 mm Hg
Body Temperature
Body temperature is the degree of heat maintained by the body or the balance between the heat produced and lost in the body. The heat regulating centre is the hypothalamus, situated in the brain.
Heat is produced in the body in the following ways
- Oxidation of food
- Exercise
- Strong emotions
- Hormonal effect
- Changes in the environment or atmospheric conditions
- Disease conditions
Heat is lost from the body through organs such as skin, lungs, kidneys and bowels.
Factors affecting body temperature
- Time and climate
- Age and body condition
- Emotion and exercise
A body temperature of 98.6°F is considered to be normal.
Temperature measurement
Definition
Taking a person's temperature assesses whether it is within a normal range. A high temperature is fever.
How the test is performed?
A clinical thermometer is used to measure the temperature of the body.
Electronic thermometers display the temperature on a digital read out.
Plastic strip thermometer
It changes colour to indicate the temperature. Place the strip on the forehead and read it after 1 minute. Read it while the strip is in place.
Clinical thermometer
It consists of two different parts. One is the bulb containing Mercury and other is a stem with measuring scales showing the lowest degree of the temperature being 35°C or 95° F and the highest being 43.3 °C or 110 ° F.
Types of clinical Thermometer
- Oral thermometer (Long and slender bulbs)
- Rectal thermometer (Short and fat bulbs)
Conversion of Celsius and Farenheit scale
To convert Farenheit scale to Celsius scale, follow the below mentioned method: If the Farenheit is 104 it can be converted to a
- C= (F-32) x 5/9
- C= (104-32) x 5/9
- C= 72 x 5/9 = 40 °C
To convert Celsius to Farenheit scale
If Celsius is 37°C
- F= C x 9/5 + 32
- F = 37 x 9/5 + 32
- F = 66.6 + 32 = 98.6° F
Common sites of taking body temperature
- Mouth
- Axilla
- Groin
- Rectum
How to prepare for the test?
Wait for 20 to 30 minutes after smoking, eating or drinking.
Why is the test performed?
The measurement of body temperature determines whether a person has fever. It may be helpful in monitoring to see if a person is ill or whether a treatment is working, especially antibiotic treatment of infections.
What does abnormal results mean?
If the reading on the thermometer is more than 1 to 1.5 degrees above the patient's normal temperature the patient has a fever. Most fever is a sign of infection and occurs with other symptoms. Abnormally high or low temperatures can be serious and patient should consult a health care provider.
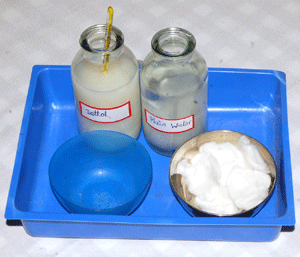
A tray containing the following things are needed
| S.No | Article | Purpose |
| 1. | Two thermometers in a jar containing Dettol lotion 1:40 with some cotton at the bottom of the jar. | Disinfection of the used thermo meter. cotton at bottom of the jar prevents the bulb of the thermo meters from breaking. |
| 2. | One jar with clean water | To rinse the thermometer. |
| 3. | Clean cotton swabs in a container | To wipe the thermometer. |
| 4. | Kidney tray | To discard the soiled swabs. |
| 5. | Watch with second hand, pen, chart | To record the TPR as soon as the procedure is completed. |
Contraindication
Patients who are extremely nervous, delerious, unconscious, hysterical, or mentally confused or those who can not follow instructions.
In mouth breathers, patients with injuries, inflammations or operations of the mouth, extremely weak persons who are not able to hold the thermometers under the tongue.
The Axilla or Groin
Advantages
- Taking temperature by axilla cause less discomfort for the patient.
- In children and other patients who are not able to hold the thermometer in the mouth, this method may be used since the nurse will be able to keep it in position without difficulty.
- Taking hot or cold drinks will not affect the temperature reading.
- The patient does not get the ill taste of the disinfectiants.
- There is no fear of biting the thermometer.
| S.No | Article | Purpose |
| 1. | Wash hands | To prevent cross infection |
| 2. | Remove the thermometer from the antiseptic lotion and rinse it in cold water | To remove the disinfectant lotion |
| 3. | Wipe the thermometer from the bulb upwards with a rotating movement using a clean cotton swab. Discard the swab | To maintain the asepsis of the bulb end |
| 4. | Shake the thermometers if the mercury level is below 35°C. Shake it with the quick moments of the wrist | To record the temperature correctly the level of the mercury should be well below the actual temperature of the patient |
| 5. | Ask the patient to open his mouth and place the thermometer under the tongue and ask him to hold the thermometer in place by closing lips and not by biting on the thermometer | To record the temperature accurately Biting on the thermometer can break the thermometer. Danger ! |
| 6. | Have the thermometer in place for one or two minutes | To allow enough time to register the body temperature |
| 7. | Remove the thermometer and wipe from the stem to the bulb with a clean cotton swab Discard the swab | Wipe from the area of fast contamination to that of greatest contamination |
| 8. | Read the level of mercury and record immediately | |
| 9. | Reset the tray |
Disadvantages
- The axilla is moist from perspiration. Presence of moisture can give false reading
- If the thermometer is not placed correctly,it may go beyond the axilla and remain in the air or in contact with the clothing and give a false reading
- For the above reasons the axillary method is least reliable
Temperature by axilla
Before placing the thermometer in the axilla, see that the axilla is completely dry. Keep the thermometer in position by placing the arm over the chest. Leave the thermometer in position for five minutes. Axillary and groin temperature are usually about 1°F lower than that of the mouth.
Taking temperature by rectum
Requirements
All the articles as described in the oral method. Instead of oral thermometer, a rectal thermometer is used (Fig. 11.1).
- Vaseline
- Swabs
Procedure
- Provide privacy
- Place the patient in side lying position (lateral)
- Lubricate the bulb of the thermometer with Vaseline and insert the thermometer about 1.5 inches into the rectum. Keep it in position for 3 minutes
- Remove the thermometers from the rectum and wipe it with clean cotton swabs
- Read the level of the mercury
- Keep the patient comfortable
- Rectum temperature is usually about 1°F higher than that of the mouth
Fever
1. Relapsing fever
Relapsing fever is one in which there are brief febrile periods followed by one or more days of normal temperature (e.g., Malaria, relapsing fever).
2. Remittent fever
Remittent fever is characterized by variations of more than two degrees between morning and evening but does not reach normal (e.g., tuberculosis).
3. Intermittent or quotidian fever
The temperature rises from normal or subnormal to high fever and back at regular intervals. The interval may vary from few hours to three days. Usually the fever is higher in the evening than in the morning.
Pyrexia
In low pyrexia the fever does not rise above 99° to 100°F or 37.2 to 37.8°C.
Moderate pyrexia
The body temperature remains between 100° to 103°F or 37.8 to 39.4°C.
Hyper pyrexia
The temperature goes above 105°F
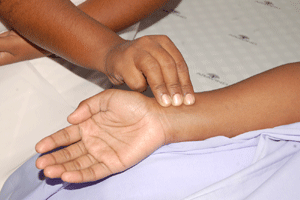
The Pulse
Definition
Pulse is an alternate expansion (rise) and recoil (fall) of an artery as the wave of blood is forced through during the contraction of the left ventricle (Fig. 11.2).
Why is the test performed?
Measuring the pulse can give very important information about the health of a person. Any deviation from normal heart rate can indicate a medical condition. Fast pulse may signal the presence of an infection, dehydration or thyroid problem.
Normal values
- New borns, infants - 140 - 160 beats / min
- Children 1 to10 yrs - 70 - 120 beats / min
- Children over 10 yrs - 60 - 100 beats / min
- Adult - 60 - 90 beats / min
- Well trained athletes - 40 - 60 per min
Important sites of palpation of pulse
- Temporal artery over the temporal bone
- The carotid artery can be recognized in the lateral part of the neck, just lateral to the larynx
- The brachial artery is situated in the anterior part of the forearm and can be palpated in the anterior part of the elbow
- Radial artery in front of the wrist
- Femoral artery can be palpated on the upper part of the thigh
- Popliteal artery (back of the knee)
- Posterior tibial artery
- Dorsalis pedis artery in situated on the anterior aspect of the foot
Characteristics of pulse
- Rate - Number of pulse beats in a minute
- Rhythm - Regularity of beats
- Volume - Fullness of artery
- Tension - Degree of compressibility
Respiration
A respiration consists of both inspiration and expiration and a pause. The respiration is controlled by the respiratory centre in the brain called medulla oblongata. Average rates of respiration at rest.
| Infants | - 30 to 40 per minute |
| First year | - 26 to 30 per minute |
| Second year | - 20 to 26 per minute |
| Adolescence | - 20 per minutes |
| Adults | - 16 to 18 per minute |
| Old age | - 10 to 24 per minute |
Respiration method
- Never make the patient conscious that you are counting his respiration. For this, place the patients hand over the chest before taking the pulse. After counting the pulse, keep the hand in place and count the respirations also
- Count the inspirations only (inspiration, expirations together make a respiration)
- Note the characteristics of the respirations
- Never count the respirations when the patient is in a state of tension
Blood Pressure
Definition
Blood pressure is a measurement of the force applied to the walls of the arteries as the heart pumps blood through the body. The pressure is determined by the force and amount of blood pumped and the size and flexibility of the arteries.
Blood pressure has two components systolic and diastolic pressure. Systolic pressure is the highest pressure recorded in arteries during heart contractions. Diastolic pressure is the lowest pressure recorded during relaxation of the heart. Blood pressure is the difference between systolic and diastolic pressure. Usually while recording the pressure, systolic pressure is written as the top recording, diastolic pressure is written below systolic pressure. (e.g.,) 120/80 mmHg (systolic / diastolic). Normal blood pressure varies according to the age of the individual.
| Systolic | Diastolic | |
| Infants | 70 - 90 | 50 |
| Children | 80 - 100 | 60 |
| Adolescents | 90 - 110 | 60 |
| Adults | 110 - 120 | 70 -80 |
| Elderly | 130 - 150 | 80 -90 |
Hypertension is a condition of abnormal high blood pressure. Hypotension is a condition of abnormal low blood pressure. The instrument used in measuring blood pressure is called a sphygmo - manometer.
Preparation of articles
- Sphygmomanometer
- Stethescope
- Chart
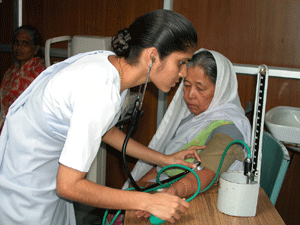
Procedure
- Explain the procedure to the patient to gain their confidence and cooperation. Place the patient in a comfortable position either lying down with the arm resting on the bed or sitting with the arm supported on the table at heart level to ensure accurate reading. Patient should be resting at least 5 to 10 minutes prior to taking blood pressure.
- The upper arm should be bare with sleeve comfortably rolled up.
- Cuff should be well tied around patient's arm with its lower edge about 3 finger breath above bend of the elbow. Centre of cuff should lie over brachial artery.
- Monometer should be at the same level as the cuff.
- Feel for the radial pulse or brachial pulse.
- Valve is tightened with fingers of one hand and cuff is inflated till pulse is impalpable. Note the pressure on the manometer. This is a rough estimate of systolic pressure detected by palpation (palpatory method) Release the pressure in the cuff).
- Now inflate to another 30 mmHg and apply diaphragm of stethoscope over brachial artery (Auscultatory method).
- Deflate slowly the cuff until the sounds can be heard through stethoscope. This is recorded as the systolic pressure.
- Continue to deflate the cuff slowly about 5 mmHg per second. The sounds muffle and then disappear. The point of disappearance is recorded as diastolic blood pressure.
- Remove the cuff and place it neatly in the box and record in the chart immediately.
- If any sudden change in blood pressure is detected while recording, the senior MLOP or ward doctor should be notified.
To summarize it can be said that checking the vital signs plays an important role in treating patients. They are to be well versed with these procedures. When the patients come for an eye test, she can perform these tests and notify the doctor about the results. While taking down the history of the patient she is to ask them whether they have BP and other systemic problems. Knowledge about vital signs will help her in the operation theatre also.
Key points to remember
- Normal vital signs change with age, sex, weight, exercise tolerance and condition.
- The heat regulating centre is the hypothalamus situated in the brain.
- Clinical thermometer consists of two different parts. One is the bulb containing mercury and the other is a stem with measuring scales showing the lowest temperature being 35°C or 95° F and the highest being 43.3° C or 110° F.
- Fast pulse may signal the presence of an infection or dehydration.
- Blood pressure is a measurement of the force applied to the walls of the arteries as the heart pumps blood through the body.
Student exercise
Say True/False
- A body temperature of 98.6° F is considered to be normal
- The measurement of body temperature determines whether a person has fever
- In low pyrexia the fever does not rise above 99° to 100°F or 37.2° to 37.8°C
- Pulse rate of new borns, infants will be 140 - 160 beats / min
- No need to worry about irregular pulse
Answer the questions
- What is the definition of vital signs?
- What are the factors affecting body temperature?
- Write the formula to convert farenheit scale to celsius scale.
- Explain the steps to be followed to check the temperature of a patient.
- Why do we check the pulse?
- What is the method used to count respirations?
- Describe the blood pressure checking procedure.