Fundamentals of Ophthalmic Instruments and their Maintenance
This chapter on introduction to instrumentation and maintenance contains valuable information about the instruments used in an outpatient department on a daily basis. As an ophthalmic assistant it is essential to identify instruments, the purpose it is used for and how to maintain the instruments. Good maintenance of the instruments prolongs its life and helps in obtaining accurate data from patients.
Different types of instruments
- Torch light
- Binocular loups
- Slit lamp
- Direct ophthalmoscope
- Indirect ophthalmoscope
- Schiotz tonometer
- Applanation tonometer
- Non-contact tonometer
- Fundus viewing lens
- Gonio lens
- Trial frame and test lenses
- Retinoscope
- Keratometer
- Neuro tray for neurological examination
Torch light (flash light)
A torch light is an instrument used by an ophthalmologist to examine the eye of a patient. A good torch light should give a circular patch of light of nearly uniform brightness
Description
The front glass cover, the bulb, the concave reflector, the switch, the cells and the barrel are the main parts of the torch. Since it is very expensive to replace the batteries frequently, a 500m A step down transformer can be used.
Care
- Keep the torch light off when not in use.
- Remove the cells when it is not to be used for more than a day, or else there will be leakage which will cause corrosion of the barrel and switch contacts.
- Torch light should be kept on the table with a support or else it will roll off the desk
Maintenance
- Wipe the dust on the barrel of the torch light and on the front glass every day
- When the illumination is not sufficient, replace the cells with fresh cells
- When the bulb is fused out, replace it with the same type of bulb
Quality control
The torch light should give a bright spot light of uniform illumination when the light is aimed at a wall from a distance of about ½ a meter in the day light.
Spare parts
- A spare bulb
- A pair of fresh cells
Ophthalmoscope
Direct ophthalmoscope
Light from a bulb is reflected at right angles and projected at a spot. This spot of light is used to view the fundus through the pupil of the eye (Fig. 9.1).
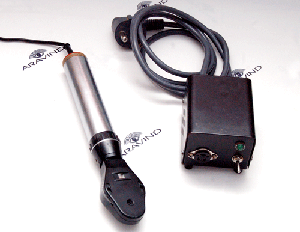
- Electrical system
- Dry cells or rechargeable batteries
- Dwitch with a rheostat that controls the current flow through the bulb for changing its brightness
- Optical system (the head)
- This is fitted on the handle with the spring loaded lock
- It consists of
- System of condensing & focusing lens
- Reflector to produce the spot of light.
- The viewing system
- Consist of a wheel with lenses of different powers ranging from -20 to +20D
- The power of the lens used for viewing is indicated on the disc and can be seen through a window in the head
- There is a provision in the head for changing the spot size or for obtaining a semi-circular spot or for reducing it to a streak
- There is a provision in the head for obtaining red free light by inducing filter in the path of light
Do's and Don'ts
- The cells have to be replaced when the battery is low
- Both the cells should be replaced
- When fresh cells are loaded the voltage could go upto 3.1v (usually 2.5 v or 2.8 v). It should not be turned to maximum brightness
- In case of rechargeable batteries, the batteries should be recharged periodically
- Sudden jerks or impact to the instrument on the table should be avoided to prevent the bulb from getting fused
- Store the instrument with the viewing lenses set at zero
Maintenance
- Remove the dust and stain on the outside of the instrument
- When not in the use keep the instrument in the box / pouch provided for it
- During rounds it should always be carried in the box / pouch provided for it
- Reverse the cell at the end of the day
Spare parts
- A spare bulb
- A pair of fresh cells
Indirect ophthalmoscope
The modern indirect ophthalmoscope helps to view the fundus with the help of a hand held high positive aspheric lens (20D) (Fig. 9.2).
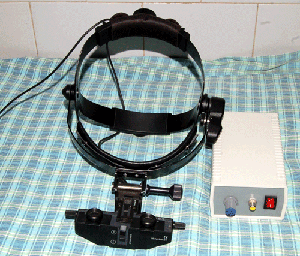
Description
- An illuminating system: consists of tungsten filament lamp or halogen lamp, a front silvered concave reflector, two condensing lens and provision for introducing filters.
- An electric system: consists of step down transformer provided with switch, a rheostat, a fuse and a sufficiently long connecting cable.
- Stereoscopic viewing system(vision box): Has two eye pieces which can be moved laterally according to the user 's interpupillary distance (IPD). The vision box is attached to the illuminating system. The light from the image of 20D lens is divided into two beams by mirrors in the vision box before reaching doctor's eye through eye piece.
- A headband that supports the illumination system: the illuminating system and the attached vision box are attached to the head band which the ophthalmologist wears. The cable for the lamp is also attached to the head band.
Care
- Use the bulb in a low illumination setting. When there is a need to increase it to a high illumination use it only for brief periods.
- The instrument should be hung using its head band only, it should not be hung on a hook by its electrical cord, since it may cause electrical failure.
- When not in use switch it off.
Maintenance
- Remove the dust and stain on the instrument daily with a clean dry cloth
- When not in use, keep the instrument in its box and keep the box closed
- The head band may get oily and may also become wet with the sweat of the ophthalmologist. The instrument must be wiped clean to remove the oil and the sweat
- When the bulb is fused out, take it to the ophthalmic instrument service station or to the dealer to get the bulb changed
Spare parts
- A spare bulb
- A spare fuse
Difference between direct and indirect Ophthalmoscopes
| Direct Ophthalmoscope | Indirect Ophthalmoscope | |
| Pupil | Undilated | Fully dilated |
| Image | Not inverted | Vertically and horizontally inverted |
| Field of view | Small(6°) | Wider(25°) |
| Magnification | Large (15) | Small (x3 in 20D lens) (x5 in13D lens) |
| Binocularity | Absent | Present |
| Effects of patients' refraction error on the image | More | Less |
Advantages of the instrument
- Stereoscopic view
- Wider field of view
- Increased illumination
- Reduced distortion
- Ophthalmologist works from a distance
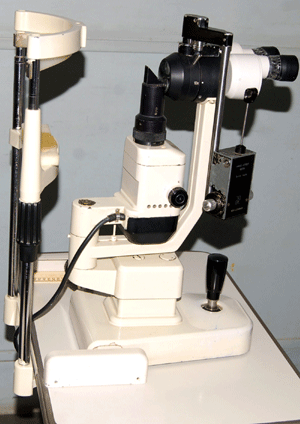
Slit lamp
Slit lamp is an instrument used to study the anterior segment of the eye under magnification (Fig. 9.3).
Purpose
- The slit lamp microscope enables the observer to view binocularly eyelids, lashes, conjunctiva, sclera, cornea, anter- ior chamber, iris, lens and the anterior portion of vitreous and permits the detection of the disease in these areas.
- It permits the examination of the angle structures, using gonio lens
- It helps to view the fundus using either 90 D, or 78 D lens
- The attachment of an applanation tonometer permits the measurement of intra ocular pressure
- It is used to deliver laser treatment to any required place in the eye
Description of the instrument
It consists of three major components
- An illuminating system consists of light source, mirrors and prisms
- Magnification system consists of the biomicroscope
- Mechanical system consists of
- Chin rest mounted on a vertical stand for placing the patient's chin in correct position. A head rest with a head band is available for securing the patients head to the stand if necessary. The height of the chin rest is adjusted manually to bring the chin rest to the level of the patient's chin
- The table is provided with castor wheels for ease in moving the equipment from one place to an other. The castor wheels have a locking mechanism to fix the equipment in place
- A joystick is provided to move the illuminating system and the microscope together up or down, left or right, forward or backward as needed during observation
The bulbs used in the illuminating system are of low voltage and a suitable transformer is provided with the slit lamp. It is always advisable to use the transformer in its lowest setting for most of the observation and to use a higher setting for a brief period for a detailed examination.
Care
- The slit lamp should to be located in a place easily accessible to the ophthalmologist in the examination room.
- An electrical plug point should be available near the equipment
- The connecting wire should not be in the path of the patients or staff.
- Remove the dust and clean the slit lamp daily
- When not in use keep the equipment covered with the dust cover
- When the ophthalmologist examines an infected case such as a corneal ulcer or conjunctivitis, clean the head band and the parts touched by the ophthalmologist and patient in the slit lamp with a clean cloth using spirit
Maintenance
- The optical paths of the microscope may get growth of fungi if the instrument is not properly cared for. Proper maintenance is required.
- The knob or the wheel is spring loaded and the adjustment of the load is such that the motions of the knob or wheel is not too tight or too lose. Lubricating the movable parts makes the adjustments easier to manipulate.
The instruments used in measurement of intra ocular pressure are;
- Schiotz tonometry
- Applanation tonometry
- Non contact tonometer
Schiotz Tonometry
Simple, portable, inexpensive instrument used in the measurement of IOP (Fig. 9.4).
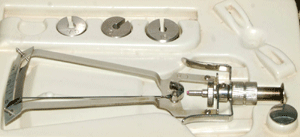
Principle
Schiotz indentation tonometry relies on the principle of indentation in which a plunger with a preset weight indents the cornea.
Parts of the Schiotz tonometer
It consists of the following
- Handle for holding the instrument in vertical position on the cornea
- Foot plate which rests on the cornea
- Plunger which move freely within the shaft in the foot plate
- A bent lever whose short arm rests on the upper end of the plunger and a long arm acts as a pointer needle.
- Scale
- Weights 5.5 gm is fixed to the plunger. Extra weights 7.5 and 10 gms are also with the instrument.
Measurement -The weight rests on the plunger, and attached to it is a pointer needle and scale for measurement. The tonometer is placed on the cornea, a reading is taken from the scale. The number is converted to millimeters of mercury (mm Hg) by using a conversion card.
Care
- The instrument should be kept meticulously clean.
- Calibration should be tested before using - A test block is provided with each tonometer. The tonometer is held perpendicular to the test block, and when placed on the block the needle should align at zero position. There is a nut screw on tonometer that can be loosened so that needle can be set back to zero.
- Never bend the needle to scale the instrument at zero.
- Adding or subtracting from the reading to allow for needle misalignment is incorrect.
Maintenance and Sterlisation of Schiotz tonometer
- Keep the instrument covered within the case while not in use
- After measurement, remove the weights and unscrew the plunger to clean thoroughly
- The plunger must move freely with in the footplate. It must be clean without particles
- The plunger is removed from the barrel and cleaned with alcohol
- A pipe cleaner is used to clean the inside of the barrel
- Sterilise the part of the instrument that will come in contact with the patient's eye with an antiseptic solution
- Allow three minutes for the alchol (sterilising agent) to dry to prevent alcohol keratitis
- The foot plate of the Schiotz tonometer may also be sterilised by flame sterilisation
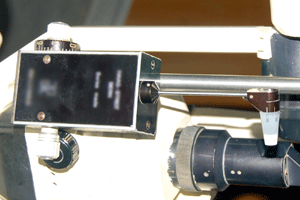
Applanation Tonometer
The Goldmann Applanation tonometry is another instrument used in measurement of intraocular pressure (Fig. 9.5).
Principle
- The tonometer is used in conjunction with a slit lamp and a cobalt blue filter.
- A drop of topical anesthetic and fluorescein dye is instilled before measurement of the intra ocular pressure
- The tonometer tip couches the eye and the force is increased by turning the adjustment knob until a circle of cornea of 3.06 mm in diameter is flattened
- The end point is when the inner edge of the two semicircles just touches each other
- Measure the force that is required to flatten the cornea and multiply it by 10 to express the intraocular pressure in millimeters of mercury
Parts of the Applanation tonometer
It consists of
- Double prism head (tonometer tip) attached by a rod to a housing that delivers the measured force, controlled by an adjustment knob.
Care
- Clean the tonometer in between patients.
- Calibrate the instrument on a regular basis using the controlled weight supplied with the instrument.
- Place the applanation head in a suitable container after use.
Maintenance
- To clean the tonometer, wipe the entire tonometer tip carefully and thoroughly with a spirit sponge and allow it to air dry for one to two minutes before use.
- Be sure to get rid of the disinfectant and allow for thorough air drying. If the patient's eye comes in contact with the disinfectant solution, corneal damage, pain and discomfort could result.
Gonio lens
It is used to visualize the angle structures in the eye. There are two types of gonio lens
- Direct gonio lenses: provides direct view of the angle and can be used for both diagnostic and surgical purposes. It does not require the use of a slit lamp and is used with the patient lying in supine position.
- Indirect gonio lenses: provides a mirror image of the opposite angle and can be used only in conjunction with a slit lamp for diagnostic purposes. This is the most commonly used gonio lens in an ophthalmic department.
Parts of the Gonio lens
- Highly polished truncated silver surfaced pyramid with a plain anterior viewing surface
- There are different types of gonio lens which are single mirror, three mirror and four mirror.
- The lens is used with a forty five degree angle so that the entire 3600 of the anterior chamber can be observed.
Care
- The lens has to be replaced in the lens case provided for it.
- The lens has to be held only at the pyramid side and plain mirror surface should not be touched.
Care and maintenance
- Clean the instrument after each use with clean cloth
- Remove the dust that cannot be cleaned with liquid, by blowing it off with dry empty bulb syringe.
- Remove finger prints or oil from the lens after use.
- Be sure that all the cleaning agents are completely removed from the lens surface.
- Check the ocular surface of the pyramid looking for any breaks that could damage the cornea while using the instruments.
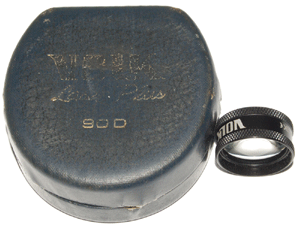
Fundus viewing contact lenses
It is a device used to examine the posterior vitreous and the posterior pole of the fundus and its periphery. The most commonly used lens are 90 D, 78 D and 20D.
90 D and 78 D
- It is a non contact lens
- These are high power condensing lenses which can be used only with the slit lamp.
- Used to shorten the light path and bring the retinal image within the focal range of the slit lamp.
- 90-D lens, which is the most commonly used, gives a wider field of view but less magnification.
- This can be used with the patient's head positioned in a slit lamp and the ophthal- mologist holding the lens in front of the examining eye and viewing through the slit lamp (Fig. 9.6).
20 D
It is also known as pan retinal viewing lens. It is a hand held non-contact biconvex lens used along with indirect ophthalmoscope. The image formed in the lens is a real inverted image. It helps to detect common retinal conditions like diabetic retino- pathy,intraocular foreign body and retinal detach- ment and view the periphery of retina to look for degenerative changes in high myopia (Fig. 9.7).
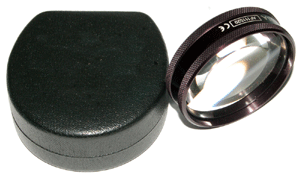
Care
- Remove the dust from the lens after use.
- Do not handle the lens by touching the lens surface.
- Replace it back in its case after each use.
Maintenance
- Clean the lens regularly with solution to remove dust and oily fingerprints.
- Do not clean the lens with a dry cloth, this will promote dust to build up.
- Do not rub the lens too hard, as this can remove the antireflective coating.
- Never autoclave or boil the lens.
Trial frame and test lenses
A Trial frame is used to carry the test lenses during retinoscopy. (Duke Elder - Refraction book Fig: 21.15).
Neuro tray
It contains all the essential equipment for a complete neurological examination
- Torch light
- Container with strong smelling substance like asfoetida / camphor
- A red colour target with handle
- A roll of cotton
- Tuning fork of 512 & 256 Hz
- Containers with sugar, salt
- Knee hammer
- Bell pins
- Inch tape
- Scale
- Ischihara pseudo isochromatic colour vision book
- Stethoscope
Description of trial frame
- It should be light, readily adaptable, allowing adjustments for each eye separately
- Anterior and posterior adjustment, lateral and vertical adjustment must be possible
- Each side can be filled with at least three cells
- One situated next to eye for spherical lens
- One in middle for a cylindrical lens, capable of smooth and accurate rotation so that there is no trouble in arriving at correct direction of the axis
- One farther from the eye for a prism, Maddox rod, etc
Trial case with Test Lenses
A typical trial set of test lenses will have spherical lenses from every quarter of a diopter up to 4D and every half up to 6D, every diopter up to 14D, every two diopter up to 20D and cylinders every quarter up to 2D, every half up to 6 D.
- Prisms up to 10 prism diopter with additional two of 15 and 20 prism diopters
- Plano lenses, opaque discs, pin hole and stenopaeic discs, Maddox rods, red and green glasses are also included
Care
- Care should be taken not to drop the trial frame
- The frame can go out of alignment if dropped
- The trial lenses should be kept in a case to help keep them clean
Maintenance
- Trial frame is wiped with a soft cloth to keep it free from dust and should be wiped between patients
- The trial lenses can be cleaned with a glass cleaner and a soft cotton cloth
Streak retinoscope
The streak retinoscope is a hand held instrument used to determine the refractive power of the eye objectively.
Description
- The instrument is similar to that of a direct ophthalmoscope.
- The light emitted from the instrument can be rotated 360 degree.
- There is no lens disc in retinoscope.
Care
- It should be turned off immediately after use.
- Bulbs should be changed when it gets fused.
Maintenance
Same as for an direct ophthalmoscope.
Non contact tonometer
It is an instrument used to measure intra ocular pressure.
Advantages
- It doesn't touch the eye.
- No anesthesia required.
Procedure
- It has a video monitor to observe the eye and set up proper alignment.
- The instrument can be table mount / hand held.
- The readings are taken when a soft gentle puff of air is directed at patients eye.
- The pressure is displayed on the radio monitor.
ContraIndication
NCT can be used on almost all patient but is contra indicated in instances of edematous or ulcerated cornea, following a keratoplasty or penetrating trauma.
Principle
By measuring time necessary for a given force of air to flatten a given area of the cornea, the IOP is calculated.
Maintenance
- The dust cover keeps the instrument dust free
- At the start of the day check the air nozzle by firing an air pulse without the patient in place
- A clean dry cotton swab or a soft cloth can be used to clean the fixation area.
Keratometer
The keratometer is an instrument used to measure the anterior curvature of the cornea. The measurements are commonly referred to ask-readings.
Purpose
These measurements are important in
- Contact lens fitting
- Determination of corneal astigmatism and
- Calculation of intraocular lens powers
Description
- Telescope like part
- Knobs - four knobs for reading angular position
- Circular scale for reading angular position
- Two nobs for making adjustments on either side of instrument
Care
- Keep the instrument covered and turned off when not in use.
- Calibration of the keratometer should be checked to assure accuracy of the readings.
- Do not attempt to adjust the drum scales.
Maintenance
- Remove the dust and stain on the equipment on daily basis.
- If bulb gets fused it has to be replaced.
Summary
In this unit we have seen the different equipment used in an eye hospital. The uses of equipment, how they are handled and how to maintain them is also clearly explained. The equipment is to be regularly checked and the defects should be rectified without delay.
Key points to remember
- Handle all the instruments with care
- If you find any fault in any of these instruments please take it to the service station
- Maintain the instruments with proper sterilisation method.
Student exercise
Fill in blanks
- The instruments used to measure the intraocular pressure are _______ and _______.
- The image of an indirect ophthalmoscope is ________.
- The handy instrument to examine the fundus is _______.
- The instrument used to measure the anterior curvature of cornea is __________.
- The instrument used to test refraction objectively is ______________.
Tick the most appropriate answer
1. The first choice of an instrument by an ophthalmologist is
| a. Slitlamp | b. Gonio lens |
| c. Torch light | d. Direct ophthalmoscope |
2. Which of the following is not a fundus viewing device
| a. 90D | b. 20D |
| c. Direct ophthal | d. Applanation tonometer |
3. The device used in the measurement in the intraocular pressure
| a. Schiotz tonometer | b. Torch light |
| c. 90D | d. 78D |
4. The neuro tray consist of all the instruments except
| a. Asafoetida | b. Salt |
| c. Cotton | d. Slit lamp |
5. 20D lens is used to diagnose all except
| a. Retinal detachment | b. Diabetic retinopathy |
| c. Intraocular foreign body | d. Increased intra ocular pressure |
True or false
- Torch light is not an instrument used by an ophthalmologist - True / False
- 90 D is an instrument used in the measurement of intra ocular pressure - True / False
- Applanation tonometer has to be mounted on a slit lamp to measure the IOP - True / False
- All lenses should be autoclaved - True / False
- Gonio lens is an instrument used to view the angle of the anterior chamber - True / False
Match the following
- 90 D - Angle structures
- 20 D - Ischihara pseudo iso chromatic colour vision chart
- Slit lamp - Non contact lens
- Gonio lens - High myopic fundus
- Neuro tray - Joy stick
Answer the following
- Name 5 instruments used in ophthalmology
- Name the non-contact lenses used in the examination of the eye
- Name the instruments used in the measurement of intraocular pressure
- What are the differences between direct and indirect ophthalmoscopy?
- What is the equipment in a neuro tray?
- Write about maintenance and care of an instrument of your choice
- Draw and label the parts of a slit lamp
Assignments
- Collect information about the instruments used in the operation theatre
- Research methods of sterilizing surgical instruments in ophthalmology
- Make a poster of do's and don't in handling the lens
- Find out the procedures done in an outpatient department
- Collect information about all the equipment taken to an eye camp
- Collect data of the companies supplying the instruments
- Prepare a ray diagram of a indirect ophthal- moscope
- Collect information about other sterilisation procedures