
Dispensing Optics
Introduction
Optical dispensing is a specialised area of eye care that includes the making of corrective lenses from refractive prescriptions and the fitting of the lenses in the spectacle frames for proper visual correction. OAs often are required to perform certain tasks related to opticianry.
OAs may be called upon to answer patients' questions or solve problems concerning the proper fitting or correction of their eyeglasses, serving as an intermediary between the doctor and the optician who dispensed glasses for the prescription. This chapter provides information about types of corrective lenses and materials used in lens manufacture. It introduces you to special optical measurements and techniques used to determine the proper fitting and correction of eyeglasses. Frame design, eye- glass care, and adjustments are also discussed.
Materials Used in Spectacle Lens
Spectacle lenses are made from three different sources of materials. They are natural resources, glass and plastic materials. In Natural media, quartz (or) rock crystal, semi-precious stones (i.e. Topaz, Ruby, etc) were widely used for making lenses in early years.
Glass materials
Now-a-days spectacle lenses are made from either plastic or a high quality glass material. Although many types of glass materials are used in optical industry, crown glass (1.523) material is extensively used for making single vision ophthalmic lenses. Flint glass, material (1.620) is used in the making of bifocal or achromatic lens. This material is used for making the bifocal segment. Flint glass material was replaced by barium crown material, which has no chromatic aberration. It increases the refractive index of the glass. Now-a days almost all high quality bifocal lenses are made only from Barium-crown glass material. The high-index glass named Hidex (1.806), is used for making high refractive power lenses, which are remarkably thin.
Plastic materials
Plastic lenses are generally made from two different materials. They are:
- Original plastic lens made of (PMMA) Polymethylmethocrylate
- Modern hard resin lens from allyl diglycol carbonate (CR 39) is harder and more resistant to scratches than other plastic lens materials. Plastic lenses are made from a very high quality material as glass.
Plastic lenses are about half the weight of glass and are highly impact-resistant, but get scratches more easily and do not protect the eye from UV rays unless properly tinted. Glass lenses unlike plastic must be treated to resist breakage. They can be hardened by chemical or heat processes.
Corrected lens
A corrected lens is a form to avoid or minimize the distortions through the edges of lens. In theory the base curve should have same curvature, which coincides with the corneal curvature of the rotating eyeball, so as to maintain the proper vertex distance between cornea and the spectacles in all gazes and avoids distortions. In optical lab each manufacturer has an individualized series of base curves for toric meniscus lenses. Corrected lenses are in different designs but mainly in meniscus lens form which usually are ground on 6.00D Base curve.
A toric lens is curved like a meniscus lens but also contains a cylinder that formerly has been ground on a convex surface in single vision lenses and on a concave surface in bifocal lens.
Types of Corrective Lenses
Two principal types of eyeglass lenses are manufactured to correct vision: single-vision lenses, which provide correction for only one distance (that is, far or near); and multifocal lenses (bi-focals, trifocals, and progressive-addition lens), which combine two or more corrections in a single lens to provide sharp vision at more than one distance. As part of the process of refraction, the doctor decides which type of lens would most benefit a particular patient.
Lens forms
This section discusses the different lens forms or the possible contours of the lens surface. Almost all spectacle lenses are meniscus lenses having both convex and concave surfaces. Different lens forms have different benefits. For instance, curved lenses are often made flatter to improve the cosmetic appearance.
Single vision lenses have the same power throughout the lens area. Single vision lens forms can be divided into the following basic categories.
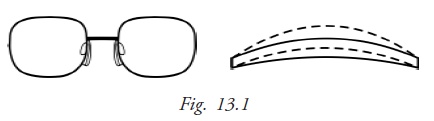
- Flat: If the lens form is flatter, the lens is thinner. Thus the best form of the lens to make it as thin as possible without making the centre too thin (for minus powers) is chosen (Fig. 13.1).
- Lenticular: This lens form is used for high powers - usually for positive powers more than +10DSph. This form reduces the thickness and weight of high-powered lenses, making them easier to fit. Having only a small central area with the actual power does this and the periphery of the lens is plano or of a lower power called carrier lens. Here the high power lens is cemented onto a base lens. This is the only way that very high-powered lenses can be made. These are used for low vision patients or aphakics. Blended lenticular lenses have the optical power zone blended with the periphery. This gives a better cosmetic appearance than simple cemented lenticular lenses.

- Aspheric: An Aspheric lens is particularly designed to eliminate the peripheral distortions. It has a complex front surface that gradually changes the lens curvature from the center to periphery. In plus lenses, the front curvature of the lens flattens toward the edge of the lens. In minus lenses, the curve becomes steeper toward the lens edge. A conventional pattern lens may be optically correct through its center but causes increased effect of the lens power as the patients vision moves away from the center to the edges of the lens.

Transposition
It is a technical formula to change the lens form from one type to another. There are two types of transpositions, Simple and toric transposition.
Simple transpositions are used to convert one form to another, usually “+” to “-”. Toric transposition is used to for meniscus and cylindrical lens manufacture.
Rules of simple transposition
- Algebric sum of sphere and cylinder is a new sphere
- Cylindrical power is the same but
- Sign of the cylinder is reversed and axis of cylinder is changed by 900
Examples
2.5 D Sph / +3.0 D cyl x 1500
Answer
New sphere = + 5.5 D Sph
New Cylinder = 3.0 D cyl
Cylinder power & axis = -Cyl & (150-90) 600
Final Rx = + 5.5D Sph / - 3.0D Cyl x 60°
Another example
- 5.5 D Sph / + 4.0D Cyl x 15°
Answer
New sphere = - 1.5 D Sph
New Cylinder = 4.0 D Cyl
Cylinder power and axis = -Cyl & (15+90) 105°
Final Rx = -1.5D Sph / -4 D Cyl x 105°
Why we do the simple transposition?
Usually we change the lens '+' form into '-' to reduce the central thickness of lens. It also minimizes the peripheral aberration, reduces weight and gives easy adaptation.
Toric transposition
Toric transposition is an application for selecting the proper form (eg. Meniscus) of cylindrical lens so that it is easy to make a good correcting lenses.
Rules
- Choose the proper Base curve first
- Do simple transposition if sign of base curve and cylinder are not same
- Find out the spherical surface power; subtract the base curve from sphere
- Find out the cylindrical surface power,
- Fix the base curve as a cylinder at right angle to the axis of cylinder
- Add the base curve and cylinder – this is the second cylinder
- Both spherical (numerator) cylindrical surface ( denominator) determines the cylindrical lens power
Example
+ 1.0 D Sph / + 2.0 D Cyl x 165* (-6.0 Base curve)
Base curve = -6.0
Simple transposition (base curve and cylindrical power are not same) = + 3.0 D Sph / - 2.0D Cyl x 75*
Spherical surface power = + 3.0 – (-6.0) = + 9.0 D Sph
Cylindrical surface power = - 6.0D Cyl x 165* -2.0 + (-6.0) = - 8.0D Cyl x 75*
| Final Rx = | + 9.0D Sph -6.0D Cyl x 165*/ - 8.0D Cyl x 75* |
Another example
+1.0D Sph / +2.0D Cyl x 180* (+6 Base)
Base curve = +6.0
Simple transposition = not required
Spherical surface power = +1-(+6) = -5
Cylindrical surface power = +6 x900 +2+(+6) =+8
| Final Rx = | - 5.0D Sph + 6.0D Cyl x 90* / + 8.0D Cyl x 180* |
Key points to remember
Transposition is applied only in optical surfacing lab
• To choose the correct tool in lens surfacing
• To bring the lens into proper curvature and thickness
Multifocal lenses and design
For Presbyopes there are many lens forms that can cater to different functions and bring different benefits:
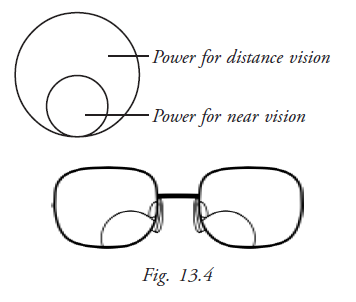
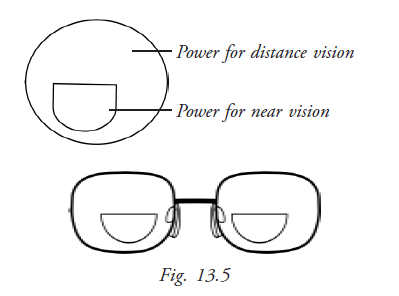
Bifocals: The lens has two distinct zones: for distant vision and for near vision. The near vision power is provided by adding or fusing a plus power lens to the distant vision power base lens. This reading segment can be designed in many ways, but it is always found at the bottom of the lens, converging towards the nasal side of the lens. In all bifocals the wearer experiences a “jump effect” when the eye travels from the distant vision zone to the near vision segment because of the difference in powers. Always warn first time bifocal wearers that they will have to adapt to the lens as there are two zones.
- Kryptok bifocal: Here the reading segment is a small circle. The eye of the user has to travel to the centre of the segment to get the maximum reading area (Fig.13.4)
- D-bifocal: The reading segment is shaped like the letter D (Fig.13.5). This is only available in plastic lenses as it is very expensive to make it with glass. The advantage of a D segment over a kryptok segment is that the maximum reading area is reached at the top of the segment itself, which makes it more comfortable. In this lens, the “jump effect” is also reduced. These are the best form of bifocals that you can recommend.
- Executive bifocal: These bifocals have the entire bottom of the lens as the reading zone (Fig.13.6). This gives a larger reading area but the jump effect is very pronounced. This is usually recommended for those who do a lot of reading and writing. However, if a patient has been using executive lenses it is very difficult for him to adapt to other types of bifocals. Thus, these are not highly recommended.

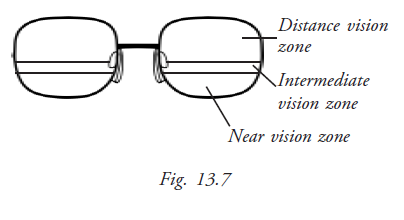
Trifocals: These lenses have three distinct power zones: distant, intermediate and near vision zones. This is not in use nowadays (Fig.13.7).
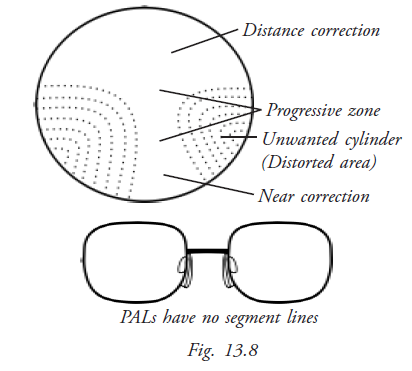
Varifocal lenses: These lenses are designed to give the closest resemblance to vision with a normal eye, as these are not distinctly divided into zones. Instead, they have the power increasing gradually from the distant vision zone to the near vision zone. There is absolutely no jump effect. The lens is more comfortable as powers are available for vision at any distance; and not only for fixed distances like > 6m and < 30cm as in bifocals. But the zone of vision is restricted and the surrounding areas are distorted. So, this lens also needs some adaptation time, as the wearer needs to adjust to viewing only along the viewing zone. Advise the patient to learn to tilt his head at different angles, to focus on objects at different distances. This lens is more comfortable and cosmetically more appealing as there is no distinct segment. These lenses are also called progressive addition lenses (PAL) (Fig. 13.8). Over 150 designs were introduced and only 70 among them are currently available.
Progressive lenses have been developed over the years to increase adaptability, comfort and its flexibility to suit any frame. These lenses are broadly classified into the following types based on their design:
- Hard design PAL: Hard lenses had large distortion areas with little reading area.
- Soft design PAL: Hard designs have been improved to reduce the distorted area and increase the reading area. These are called soft PALs and are much more comfortable and easier to adapt to.
- Short corridor PAL: These lenses have a short intermediate corridor enabling the lens to be fitted into smaller frames.
While dispensing PAL lenses demonstrate the clarity of different viewing zones by having the patient focus on objects at different distances. Also, remind the patient that he will take a while to adapt to the lenses; and that he must learn to view only along the progression zone and not the distorted area – in order to view objects on the side he must turn his head instead of moving his eye alone.
Tinted lenses and photochromic lens
By using the appropriate chemical dying agents, a white lens is dyed in variety of colours or mirrored evenly (Fig.13.9). Tinting generally is being done eiher with lens itself or lens surface. The popular tints are available as green, neutral gray, pink, brown and transparent one-way mirror surfaces. Tinted ophthalmic lenses give an even colouring across the whole surface of the lens whether it is a strong plus or a strong minus lens. The coating, whether it is anti reflection mirror or colour may be removed chemically in about 10 seconds, should this be necessary.
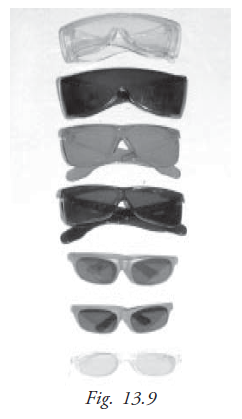
Almost all sunglasses are white lenses coated with colour. However, coloured-glass lenses are still available that are perfectly satisfactory for plane and weak power prescriptions. In high-powered lenses, such tinted lenses are not suitable. The tinted lens usually reduces the actual illumination level in the eye so that such lenses are not suitable for high power lens and Bifocals. Neutral gray tint has been the most popular tint for sunglasses. Because of its neutral absorption of all colours of the visible spectrum, light intensity is reduced without colour distortion or imbalance- a very important factor when proper colour perception is concerned. Such a gray lens can be recommended for one who wants protection from “intense light” or glare without loss of colour patterns. A green tint lens will absorb most of UV and IR light and transmission peaks roughly at the same point as the luminous curve of the eye. Green lenses are recommended for situations with high amount of reflected (UV) light. In industry green lenses of various densities are used for welding and other high light and heat situations. They also have the psychological effect of “coolness” during hot weather and thus provide comfort to the wearer. For many years, brown tints were very popular. Brown lenses absorb almost all of the UV light and have a very even progressive curve throughout the visible spectrum. This type lenses are most useful for moderate-to-cold-climate with the added benefit of creating a “warm” visual environment. Yellow tint lenses by absorbing UV, violet, and blue areas of the light spectrum will enhance contrast in the rest of the visible spectrum. A yellow lens therefore is preferred to increase contrast in marginal light conditions, such as twilight and foggy condition, but should not be worn to protect against excessive light.
Other tints, such as pink, purple and mauve are deviants of the aforementioned tints and are used mainly as fashion accents.
Photochromic lenses
Photochromic lenses have the ability to change their shade from light to dark and back again when exposed to different sunlight intensities. The silver halide microcrystals in the glass, which give this ability never wears out. The halide becomes darken when exposed to UV light or blue end of the spectrum. The clear photo-chronic lens darkens only to the point where 15% of the light is filtered out and is not really dark enough when compared with standard sunglasses. It is available in three different colours; grey, pink and brown.
In dispensing tinted lenses it is important to know about light conditions and environment the lenses are going to be used in. In dark areas, tinted lens will dilate the pupil and reduces the visual acuity. Generally the tinted glasses are not advisable for high refractive error glass wearers and presbyopes. It reduces the actual illumination and disturbs the functional vision. Tinted lenses also make difficult to identify the colours and ultimately cause poor cosmetic appearance especially in high refractive lenses because they give uneven colouring across the lens.
Special Coated Lenses
Mirrored sunglasses
In mirrored sunglasses a one-way mirror surface is placed on a white or coloured lens to convert it in to a sunglass for special purpose. Mirrored sunglass gives a good cosmetic appearance to patients with facial disfigurements' and at the same time they can see clearly through the mirrored lenses.
Anti-reflection coating (AR)
Artificial powerful lights (i.e.) halogen lights in cars and trucks, and computer monitors can cause reflections in untreated glass. When light passes through spectacles some light rays are reflected by front and back surface of the lens producing ghost images. AR coated lens prevent these images and only one image is seen. The coating material is very tough and usually lasts through out the life of the lens. It will be seen on the surface of the lens. These coated lenses should be cleaned with proper special cleaning solutions. AR coated lenses are readily available in market and it can be coated separately too.
Ultraviolet and blue-blocking lenses
Tinted lenses that filter out over 98% of blue and UV light are available. They are made of CR-39 plastic which is coloured amber to red. For the normal individual these lenses provide comfort from glare, reduce haziness and create sharper vision. The light-coloured lenses may help persons with developing cataracts to see well. The darker red lenses may improve the functional visual acuity in conditions like Retinitis Pigmentosa albinism, aniridia and intense photophobia.
Safety lens
The risk of damage to the eye is minimised by the use of safety glass. It is for those engaged in industrial works and sports to use it.
Hard-resin lenses
These are safety lenses with no additional treatment. A shattered hard-resin lens does not have the sharp splinters typical for broken glass. Hard resin lenses are superior to hardened glass for welding, if not metal may splatter on the lens. Another type of safety lens is the laminated lens in which a sheet of plastic is sandwiched between two pieces of glasses. If the lens is shattered, the glass particles adhere to the plastic.
Poly carbonate lens
First introduced as safety goggles in industry, polycarbonate lenses are the most impact resistant lenses now available in the market. They out perform plastic and glass heat-treated or chemically treated lenses. Polycarbonate is now being moulded into ophthalmic Rx lenses that are coated to reduce their tendency to scratch.
Heat-treated impact-resistant lens
The polished lens is heated on an oven almost to its melting or softening point, removed and then rapidly cooled by blasts of cold air on both surfaces simultaneously. The surfaces cool and contract quicker than the interior of the lens compressing the interior of the lens. Eventually the interior portion of the lenses cools and contracts and the lens becomes hard.
Safety lenses are recommended mainly for children, and by those who engaged in contact sports and industrial works.
Lens power measuring
In optics, an ophthalmic lens is constructed so that its refractive power is constant at center of the lens rather than the edge of the lens. Lens power is usually measured by either a conventional method called hand neutralisation or the use of a lensometer.
Hand neutralisation by trial lens method
It is very simple and conventional procedure to neutralise the power of a lens with trial lenses. This method is being qualitatively followed by many practitioners.
Procedure
- First checking of a lens often involves simply identifying if it is a sphere or cylinder in +'' or '-'' form lens
- Hand neutralisation is usually done by viewing a distant cross target through the lines whose limbs extend beyond the lens edge
- The lens is moved up and down, and left and right to ascertain the presence of a 'with' or and 'against' movement
- A 'with' movement is seen with minus powered lenses and an 'against' movement is seen with plus powered lens
- Movement is neutralised using an opposite power trial lenses. That is, a 'with' movement occur in concave lens is neutralised by placing the '+' power trial lens in contact with the unknown power lens
- The power of the trial lens is increased until no movement of the cross hairs is seen
- If the unknown lens is spherical, the movement and speed will be the same in both principal meridians
How to find out the cylindrical power
If the lens is cylindrical or sphero-cylindrical then every meridian need to be neutralised one by one.
- To find the principal meridians hold the lens against the cross-hairs.
- Rotate the lens about its optical axis
- At some positions, the appearance of cross-hairs through the lens will not be continuous with those outside the lens and will not be at right angles to each other.
- Rotate the lens such that the lines within the view of the lens are continuous with those outside the lens. This will constitute the principal meridians; these can be marked and individually neutralised. This will constitute the principal meridians; these can be marked and individually neutralised
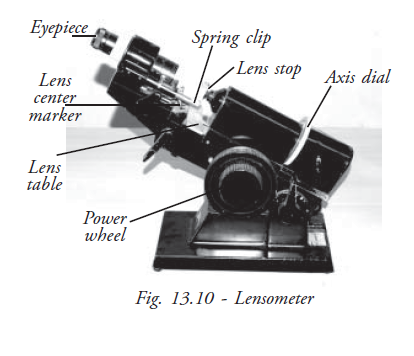
Lensometer and procedures
The lensometer is also known as Focimeter or a vertometer (Fig.13.10). The main use of the lensometer is to measure the back or front vertex power of a spectacle lens. The optical centre of the lens is located in order to position the lens correctly, relative to the visual axes and the centre of rotation. When the optical centre is positioned correctly in the lensometer, the sphere, cylinder and its axis and prism power can be measured. The power of the lens is measured by placing on the lens stop.
Procedure
Focusing the eyepiece
The eyepiece should be focused at each use as the setting will vary between individuals. Rotate the eyepiece until fully extended from the instrument (usually by rotating the eyepiece as far as possible in an anticlockwise direction). The graticule visible through the eyepiece will now appear blurred. The eyepiece should then be rotated in a clockwise direction until the target crosshairs and the graticule just come into focus. Continued rotation of the eyepiece will force the observer to accommodate in order to keep the graticule in focus. Accommodating whilst viewing the target can cause variability in the power measurement. With the power wheel at the zero position, the cross hairs and the target should be in clear focus. Failure to focus the eyepiece will result in incorrect readings of lens power.
Determining the lens power (Spherical lenses)
If all the lines or dots of the target are in focus at a given setting of the power wheel, the lens is spherical.
Marking the optical centre
- Check that the centre of the lens coincides with the centre of the target
- When this is so, the lens is correctly positioned and the optical centre could be marked
- While there is no centre dot, the whole set of dots can be 'framed' within the lines of the graticule to locate the centre
- Repeat the same procedure for the other lens.
Determining the lens power (Sphero-cyl lenses)
- Step 1 (finding the sphere power) Rotate the power wheel until one set of lines (stretched dots) becomes clear. Start with the higher positive power (or lower negative power). The axis drum will need to be rotated to ensure that the lines are unbroken. Note the power on the power wheel.
- Step 2 (finding the cyl power) Rotate the power wheel until the second set of lines (stretched dots) becomes clear. The second power reading minus the first reading will give the power of the cyl (and its correct sign).
- Step 3 (finding the axis) Note the direction of the lines (stretched dots) at the second reading. This is the axis. The rotatable line in the graticule is used to line up with the stretched dots to determine the axis.
Examples:
- Step 1 (finding the sphere power) Rotate the power wheel until one set of target (lines or dots) becomes clear. Start with the higher plus power (or lower minus power). The axis drum will need to be rotated to ensure that the target is unbroken. Note the power on the power wheel. In this case the power reading is +2.00D.
- Step 2 (finding the cyl power) Rotate the power wheel until the second set of targets becomes clear. The second power reading minus the first reading will give the power of the cyl (and its correct sign). In this case the second reading is –1.00D. So the cylinder power is: -1.00 and + 2.00 becomes -3.00D.
- Step 3 (finding the axis) Note the direction of the lines at the second reading. This is the axis. The lines are lying at 90 degrees.
So the lens power prescription is +1.00/-2.00 X 90 degrees.
Determination of prism power with lensometer
The lens is correctly positioned with the optical centre on the lens stop. If the target is displaced either vertically or horizontally, then the prism is present in the lens.The direction of the displacement of the focimeter target indicates the base direction of the prism. Thus, if the target is displaced upwards from the centre of the crosshair, base up prism is present in the lens. The value of the prism is measured from the centre of the target to the centre of the eyepiece scale.
Conclusion
Accurate measurement of lens power and the location of the optical centres is an important part of the successful prescribing and dispensing of ophthalmic lenses.
Spectacle frame
The part of the spectacles that holds the lens is called the frame. This usually rests on the bridge of the nose and the ears. Frames are available in a variety of shapes, structures, materials and colors. The frame that one chooses can affect the comfort, vision and looks of the spectacles and its wearer. Thus it is important to help the customer to choose one most appropriate to his physical features and his habits. This section deals in depth with the parts of a frame and types of frames – differentiated based on design and material. It also discusses what features are desirable for a spectacle frame.
Parts of a frame
The basic parts of a spectacle frame are (Fig.13.11)
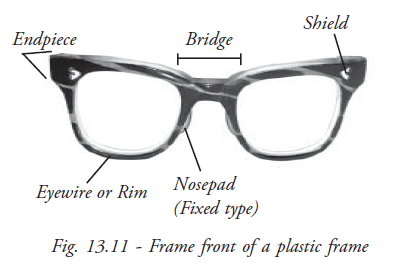
- Eye wire: Eye wire is the rim that holds the lenses. The eye wire has a groove running along its inner surface wherein the lenses are held.
- End-piece: The extended outer portions of the frame front, on both the sides, are the end pieces.
- Front: The portion of the spectacle housing the lens - including the eye wire, end-pieces and bridge, forms the front of the frame
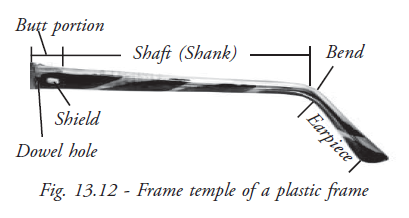
- Temple: The temples are the sides of the spectacles, connecting the frame-front and resting over the ears (Fig.13.12). Usually the front and the temple are made of the same material. The types of temples include:
- Skull temple: This is the most common type of temple. The skull temple is most comfortable for those people who wear their eyeglasses for long periods of time. It fits easily on the ear, and bends slightly to fit the skull and lightly hug the head.
- Library temple: The temple is a straight line with rarely a slight bend at the very tip. It is suitable for those who need to remove their spectacles many times a day as in reading glasses.
- Riding/Cable bow temple: This temple has a curved earpiece and fits around the ear. It hugs the ear, and is more difficult to remove. This type of temple would be particularly helpful for those people whose jobs are very active, or for children.
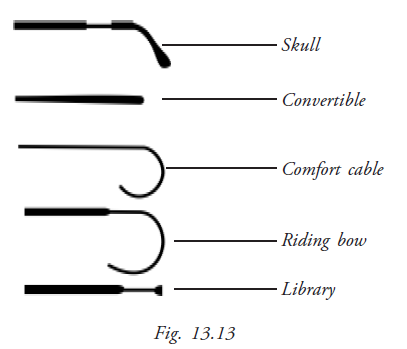
- Convertible temple: This looks like a straight line without bend. It can be converted from one shape to another. It can be bent to any shape for comfort (Fig.13.13).
- Hinge: The hinge connects the temple to the front. This is usually made of metal. It is made of two leaves, one attached to the front and the other to the temple, which when aligned form a barrel with a hole called the dowel. The two parts are fixed together by a pin running through the dowel hole. Each leaf of the hinge has many loops which are in one of these ratios: 1:2, 3:2, 3:4, and 4:5. Usually, as the number of loops increases, the thickness of each loop is reduced and so the strength of the hinge is also less. These are traditional hinges. Today, many fancy designs are available. When the temple is made of memory metals which are flexible, there is no hinge at all. Spring hinges use a spring tension to press the temples of the frame closer to the sides of the head. This allows for a closer, snugger fit. As a result, models with spring hinges are usually more expensive.
Frame materials
Desirable qualities in a spectacle frame are:
- Durability - the frame must be able to withstand wear and tear
- Light-weight – if the frame is too heavy it is uncomfortable for prolonged use and can also cause marks on the wearer's face
- Flexible - the frame must be flexible enough to be easily adjusted, to insert the lens and to withstand different everyday conditions and handling
- Maintain the original shape
- Fast Color - The coloring on the frame must not fade, peel or wash off
- Inert to body fluids – frame material must not react to common body secretions like sweat and sebum. It should not cause any skin allergy.
- Inexpensive
Types of spectacle frame structure
Types (Construction) | Plastic | Metal | Combine(Metal Chasis & plastic top) |
|---|---|---|---|
Parts | Front & Temple | Front & Temple | Front & Temple |
Basic Material used | Cellulose Nitrate | Gold | All the materials at required proportion |
Weight | Light Weight | Light Weight | Light Weight |
Colour | One colour | One colour | One colour |
Interpupillary distance (IPD)
Interpupillary distance, the distance between the centre of the pupils, is measured in millimeters. This measurement should be obtained both at distance and near for each patient. Both a binocular measurement (a single recording of the total distance from pupil to pupil) and a monocular measurement (the individual distance from the center of the bridge of the nose to the center of each pupil) should be recorded.
In orthophoric (normal) patients, the eyes look straight ahead when they focus on an object directly in front of them. Eyes that are straight in the primary gaze (straight ahead) will have virtually parallel axes when they fixate on a distant object. However, when the same pair of eyes focus on a near object, the eyes converge (turn in slightly) to allow both foveas to fixate on the object. Because of this convergence, the near IPD will be lesser than the distance IPD.
The distance IPD measurement is required to fit the power spectacles both single-vision and multifocal. The near IPD measurement is required when single-vision or multifocal eyeglasses are prescribed for reading or other specified near tasks. The accurate measurement of both distance and near IPD ensures the appropriate placement of the optical centers of the eyeglass lenses. If the distance between optical centers (DBOC) does not correspond to the patient's IPD, the patient can experience double vision.
Therefore, the MLOP should verify the correct IPD and DBOC for all eyeglasses, whether they are new prescriptions or eyeglasses brought in by patients with vision complaints.
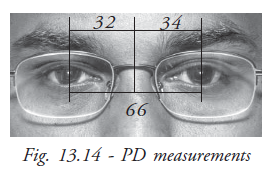
Several methods exist for measuring distance or near IPD. In addition, either binocular or monocular measurement may be chosen. Monocular measurement of IPD is considered more accurate than binocular measurement because the monocular recording takes into consideration any facial asymmetry that might be present (Fig. 13.14).
A binocular distance IPD requires just one pupil-to-pupil measurement made with a millimeter ruler. For a monocular distance IPD measurement, the distances between each pupil and the bridge of the nose are measured separately and the results are added together to yield a single measurement. Simple and accurate monocular IPD measurements may be made with a specially calibrated ruler and a penlight.
Both binocular and monocular near IPD may be measured or calculated. Measuring the binocular or monocular near IPD requires both the millimeter ruler and the penlight.
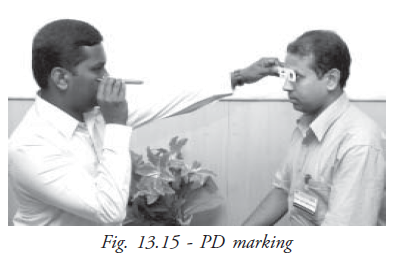
Measuring monocular distance PD
- Position yourself 40cm in front of the patient. Make sure your eyes are level with the patient's eyes. Hold the IPD ruler lightly over the bridge of the patient's nose.
- Hold a penlight under your left eye, aiming the light at the patient's eye. Note the position of the spot light reflection called the corneal reflex on the patient's right eye (Fig. 13.15), and record the number on the ruler just below the reflex. This represents the number of millimeters from the patient's right corneal reflex to the center of the bridge of the nose.
- Hold the penlight under your right eye, aiming the light at the patient's eye. Observe the corneal reflex on the patient's left eye. Record the number of millimeters from the left corneal reflex to the center of the bridge of the nose.
- Add the two numbers together and record the sum on the patients chart or form as appropriate
Face measurements
An Inaccurate size frames greatly affect the overall cosmetic appearance and comfortness of the wearer. In order to fit the spectacles correctly, some technical measurements need to be taken.
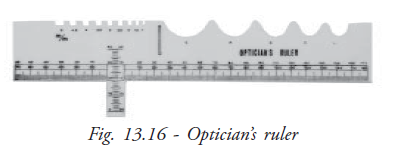
Face measurements are taken to choose the appropriate size frame and to hold the spectacle in place. An Optician's ruler is a device used for it (Fig.13.16).
The measurements are:
- Bridge size: This is the width of the bridge of the nose
- Intra temporal distance: This is the distance between the temples
- Temple length: This is the distance between the temple and the top of the ear
- Pantoscopic tilt: This is the angle between the normal to the temple and the frame front
- Vertex distance: This is the distance between the front of the cornea and the back of the lens
- Segment height: The reading segment should not be placed more than2 mm below the lower eyelid and the frame should be large enough to accommodate at least three-fourths of the segment area to enable comfortable near vision.
Progressive lenses need to be fitted with an additional care as the patient will be sensitive to even slight changes.
Back vertex distance and lenseffectivity calculations
The Back vertex distance is usually measured between the front surface of the cornea and back surface of the lens. The normal vertex distance of spectacle lens is about 12mm.
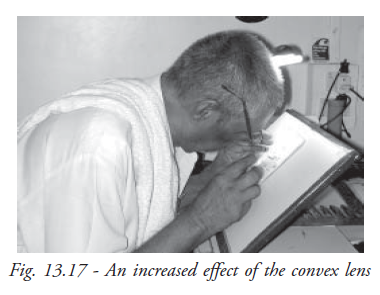
When the convex lens moves away from the cornea, its effective power increases and towards the cornea its effective power decreases (Fig.13.17). Similarly a concave lens moved away from the cornea its effective power decreases. When it moves towards the cornea its effective power decreases. When a patient is tested at 12mm vertex distance and found to have 12.0D Sph error and vision is 6/6 by moving the lens the vision is reduced. This is because the effective power is changed. Vertex distance at the time of testing must be equal to the vertex distance after wearing the spectacle. The vertex distance measurement is very essential for all high refractive errors. The distance is measured by means of an instrument called as, 'Distometer'. It must be available both at the time of writing the prescription as well as choosing the frame in the optical shop.
Lens optical effect may vary with vertex distance that causes poor visual performances i.e decrease of vision. If moves away from eye, the effectivity of the '+' lens becomes stronger and becomes weaker in '--'' lens.
Example
If the vertex distance are not the same, appropriate correction in the power is required as given below
- A patient is refracted at 15 mm and prefers to wear a -10.0 D of his glass at 10 mm. What is the effective power in the position?
Fe=
f'v
1-df'v=
-10
1-(-0.05)(-10)=
-10
1-.050= 10.57 D
- A patient found to have a +8.0 D at 15 mm and now the patients wants spectacle at 11 mm what power should be ordered?
F=
+8
1-(0.004)(+8)= + 8.25D(d is +ve )
- Patient expresses desire for contact lens of -6.5D power tested at 15 mm .What power to be ordered for contact lens?
Fe =
-6.50
1-(.015)(-6.5)= -5.9D
- Refraction of an aphakic eye is performed at a vertex distance of 13mm and shows need for +12.0DSph. If the lens is now dispensed and worn at 17mm from the cornea. What is the effective power of the lens in this new position?
Fe =
+12.0
1-(.004) (+12)=+12.605D (d = +. 004)
Trouble shooting techniques in problematic spectacle
When a patient comes with complaints in his / her new spectacle, the following things must be checked.
- Delivery: Check the delivery slip to find out whether the spectacle has been delivered to the right person or not. Always refer the patient's medical record number to avoid unnecessary confusions.
- Power and Lens design: Make sure that the lens power and lens design are dispensed as per given prescription. The examiner may make a mistake, the optician and the optical lab technician also are liable to make mistakes.
- Wrong prescription: Ensure the prescription power details that has documented correctly because the examiner might have done a mistake while writing the prescription.
- Spectacle alignments: Fix the spectacle on the patient's face and observe the patient's head posture to check the proper alignments of the frame and segment height of bifocal. Misaligned frames and improper frame size can also cause the following problems:
- Vertex Distance variations,
- Frames slide forward
- Frames fit loosely
- Frames may be positioned awkwardly to see
- Frames temples create pressure on the side of the head or at the ears
- Eye lashes or eyebrows touch the lenses.
- Poor Centration: This is the most common defect in dispensing. The lenses may not be centered properly according to the patient's PD that may cause blurring vision. Check the 'Centring' of the spectacle whether it is correct or wrong.
- Incorrect frame size: The frames may be either too big in size or small compared to the patient's face. If so, the patient may experience the new type of distortions which causes adaptative problems to the wearer.
- Vertex Problem: Ensure that the vertex distance is maintained at normal distance. It is important that the spectacle must be positioned at 12mm especially in high power lenses having more than ± 4.0D, The VD should be measured by Distometer to avoid the power variation that could lead to vision difficulties with spectacles.
- Unwanted Prism: Lenses may induce the prism effect due to the surfacing problem that will cause headache and giddiness to the wearer. It occurs occasionally in glass lenses and not in plastic lenses. Check the lens in lensometer for confirming and measuring the prism-induced in the lens.
- Base curve: An incorrect form of lens will cause the discomfort vision and heaviness of the spectacle. Use Geneva lens clock to check the proper thickness and the lens curve. Shadow scope or Polaroid lens can be used to identify the lens defects.
- Inaccurate Prescription: Take the patient to senior refraction staff to confirm whether the prescription is appropriate.
- Counselling: If there is no technical problem found, do the re-counseling gently so that it will be possible to understand the real cause of his /her dissatisfaction with glass. The other reasons cost factor, poor counselling and the behavior of the personnel could also make the patient unhappy.
Summary
The OA learned from this chapter about the different types of lenses, frames and the materials used to manufacture them. It is taught as to how to take measurements effectively and also to rectify the complaints in the spectacle and satisfy the patients.
Key points to remember
- Ophthalmic lenses are prescribed mainly to correct the vision problems
- Induced prismatic effect can cause eye strain, headache and blurred vision
- Spectacle frames are made up of either plastic or metal
- Technical measurements in dispensing are very important to provide comfortable and clear vision
- OA's knowledge and attitude is highly important to ensure the patient satisfaction
Student exercise
Answer the following
- What are the types of corrective lenses?
- Describe the tinted lens
- Discuss about the PD measurements
- Explain the back vertex distance with an example
- Describe the step by step procedure of dealing with the patients who feels unhappy with new glass